
Installing and Configuring Windows Admin Center for Windows Server 2022 Management
Windows Server 2022 can be installed with full graphical user interface (GUI) or in a reduced graphical user interface as Server Core. In Windows Server 2022 with GUI, you can use Windows Server-Manager for configuring your servers. You can also use Windows Server-Manager to manage remote Servers with GUI or as Server Core installation. Important is to know that we still have the GUI, but we have no new management features in the GUI Version of Windows Server 2022. All the new Features since Windows Server 2016 like nested Virtualization, switch embedded teaming (SET), Storage Spaces Direct (S2D) and much more can only be configured via PowerShell or via the future management solution: Windows Admin Center. The official Windows Admin Center documentation on docs.microsoft.com says:
“Windows Admin Center is a locally deployed, browser-based app for managing Windows servers, clusters, hyper-converged infrastructure, as well as Windows 10 PCs. It is a free product and is ready to use in production.”
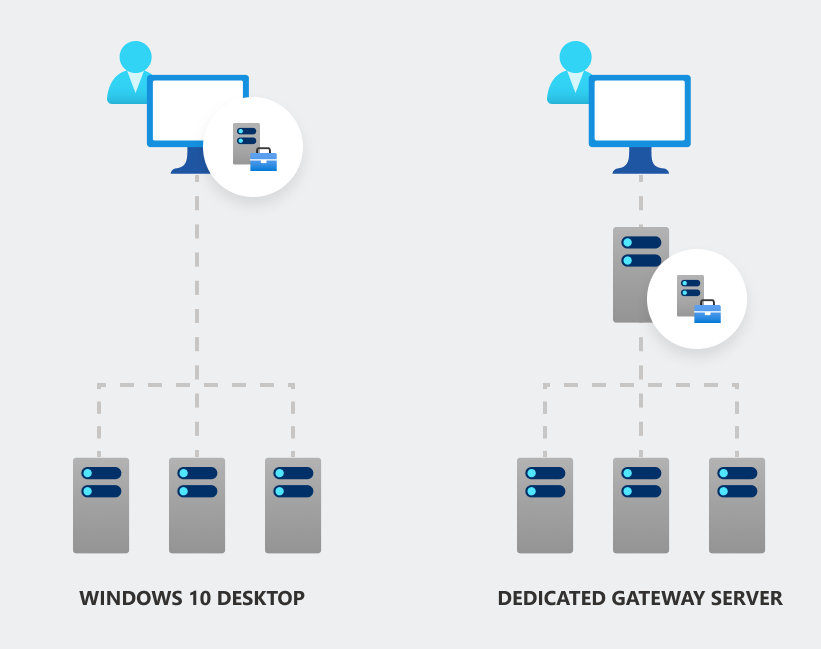
There are several deployment options for Windows Admin Center available. The two most popular are to install Windows Admin Center on a Windows 10 or Windows 11 Desktop (for single usage) or on a dedicated Gateway-server also called management server:

In some scenarios its is also possible to install Windows Admin Center on the Managed node and it is possible to install Windows Admin Center in a highly available configuration.
Windows Admin Center will also be available in Azure to manage Azure and on-premises Workloads – this service is in preview.
Windows Admin Center does not install any Agents on the managed Target computers. Windows Admin Center uses PowerShell and WMI over WinRM to get information about the target computers and to configure them. If Windows Admin Center is not available all configured Workloads on the target computers including hybrid workloads will run without any limitations or impact.
Windows Admin Center provides very powerful hybrid capabilities, but all these hybrid capabilities are optional – the author of this article recommends using the power of the hybrid services, but you can also run Windows Admin Center in a disconnected scenario.
This Article Describes how to install Windows Admin Center on Windows Server 2022 to manage other Windows Server systems in your Domain.
Content of this step-by-step guide:
Installing Windows Admin Center on Windows Server 2022
Open Windows Admin Center and configure settings
Add Servers to Windows Admin Center
First steps in managing Windows Server with Windows Admin Center
Installing Extensions for Windows Admin Center
Installing and Configuring Windows Admin Center for Windows Server 2022 Management
Windows Server 2022 can be installed with full graphical user interface (GUI) or in a reduced graphical user interface as Server Core. In Windows Server 2022 with GUI, you can use Windows Server-Manager for configuring your servers. You can also use Windows Server-Manager to manage remote Servers with GUI or as Server Core installation. Important is to know that we still have the GUI, but we have no new management features in the GUI Version of Windows Server 2022. All the new Features since Windows Server 2016 like nested Virtualization, switch embedded teaming (SET), Storage Spaces Direct (S2D) and much more can only be configured via PowerShell or via the future management solution: Windows Admin Center. The official Windows Admin Center documentation on docs.microsoft.com says:
“Windows Admin Center is a locally deployed, browser-based app for managing Windows servers, clusters, hyper-converged infrastructure, as well as Windows 10 PCs. It is a free product and is ready to use in production.”
There are several deployment options for Windows Admin Center available. The two most popular are to install Windows Admin Center on a Windows 10 or Windows 11 Desktop (for single usage) or on a dedicated Gateway-server also called management server:
In some scenarios its is also possible to install Windows Admin Center on the Managed node and it is possible to install Windows Admin Center in a highly available configuration.
Windows Admin Center will also be available in Azure to manage Azure and on-premises Workloads – this service is in preview.
Windows Admin Center does not install any Agents on the managed Target computers. Windows Admin Center uses PowerShell and WMI over WinRM to get information about the target computers and to configure them. If Windows Admin Center is not available all configured Workloads on the target computers including hybrid workloads will run without any limitations or impact.
Windows Admin Center provides very powerful hybrid capabilities, but all these hybrid capabilities are optional – the author of this article recommends using the power of the hybrid services, but you can also run Windows Admin Center in a disconnected scenario.
This Article Describes how to install Windows Admin Center on Windows Server 2022 to manage other Windows Server systems in your Domain.
Content of this step-by-step guide:
Installing Windows Admin Center on Windows Server 2022 3
Open Windows Admin Center and configure settings 8
Add Servers to Windows Admin Center 13
First steps in managing Windows Server with Windows Admin Center 17
Installing Extensions for Windows Admin Center 23
Installing Windows Admin Center on Windows Server 2022
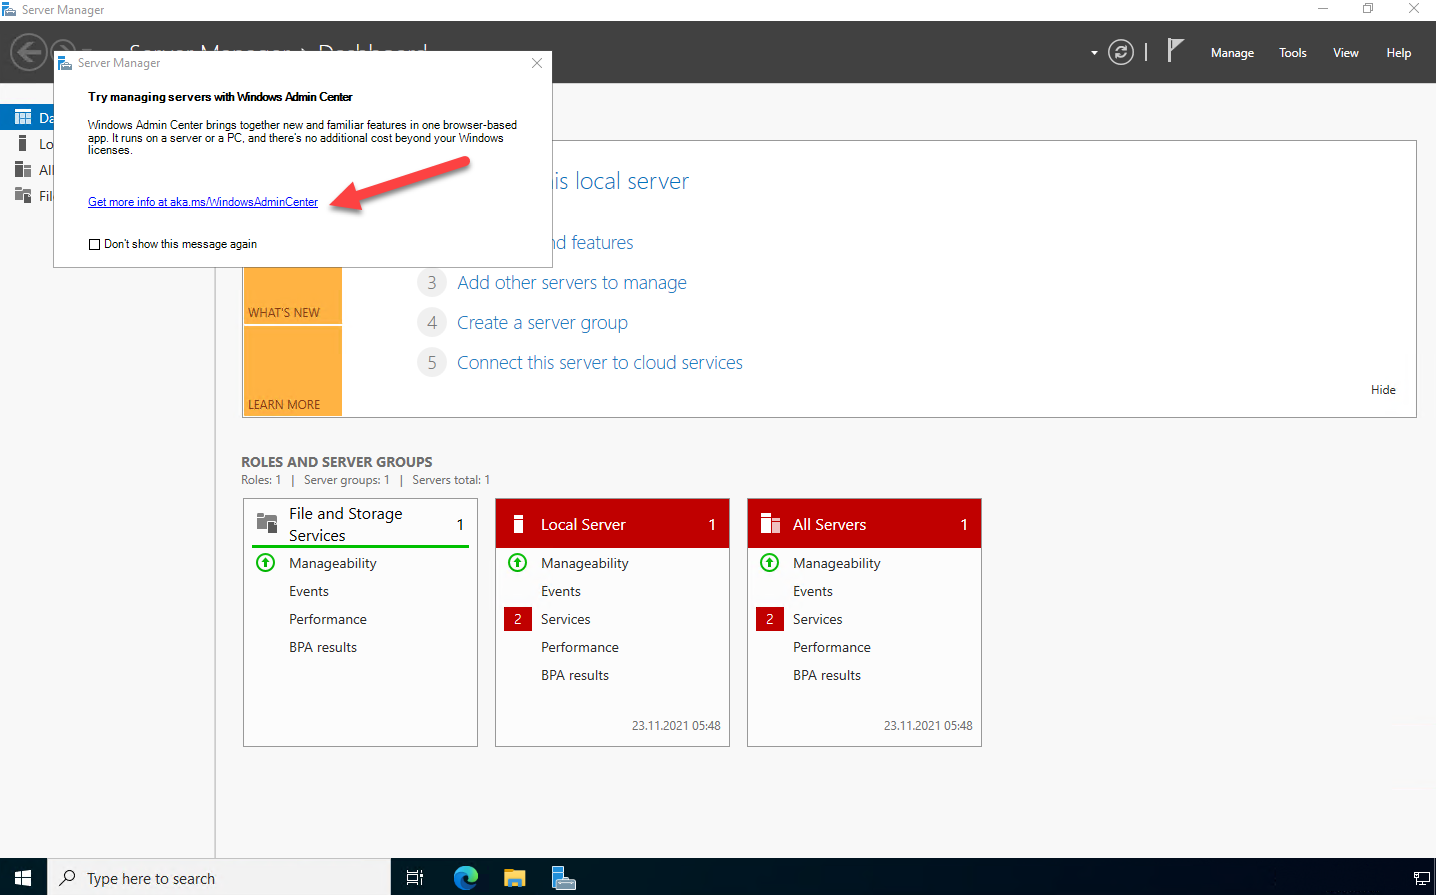
When you log-in to a Windows Server 2022 system and start Server Manager you will always se a Message recommending you use Windows Admin Center. The recommendation is using Windows Admin Center on your network and not to install it on every server:

When you click on the link you will see the Windows Admin Center documentation in your default browser. You can also access this documentation directly via: https://aka.ms/windowsadmincenter
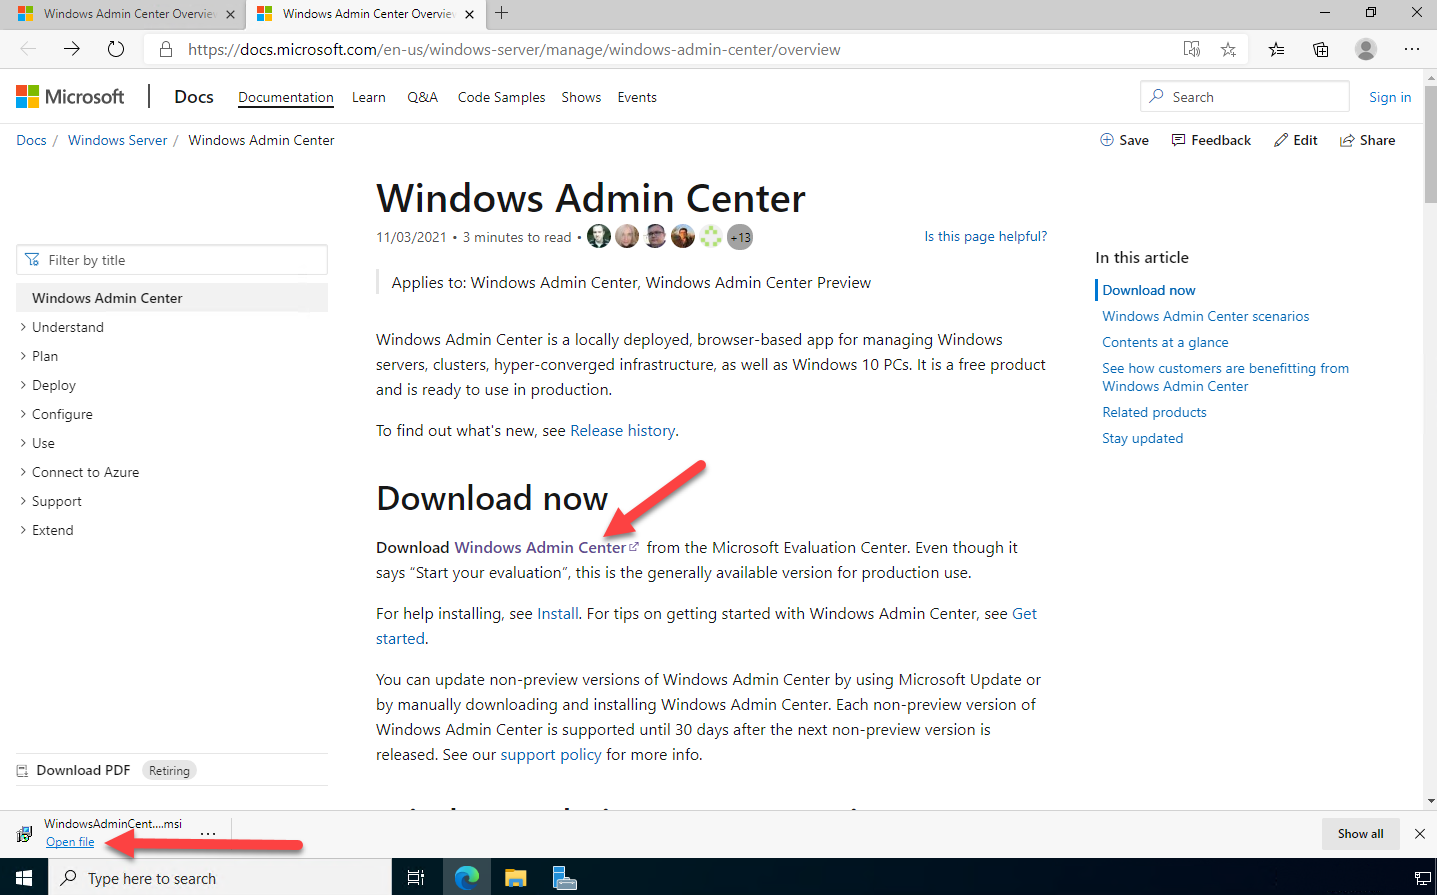
You can download Windows Admin Center via the link in the documentation or via the direct link https://aka.ms/downloadWAC
Please fill out the registration form and download the installer for Windows Admin Center. The Windows Admin Center MSI package is small (~100 MB) and brings everything you need for installing and running Windows Admin Center. When the download has finished click on “Open file”
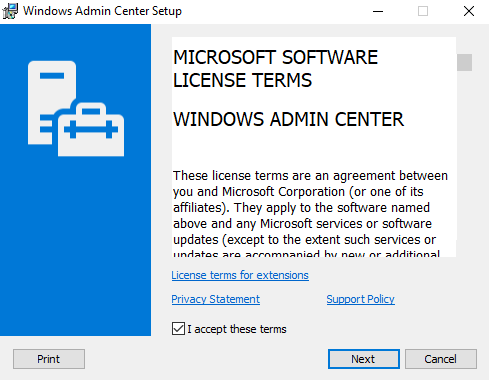
Select „I accept these terms” and klick next:
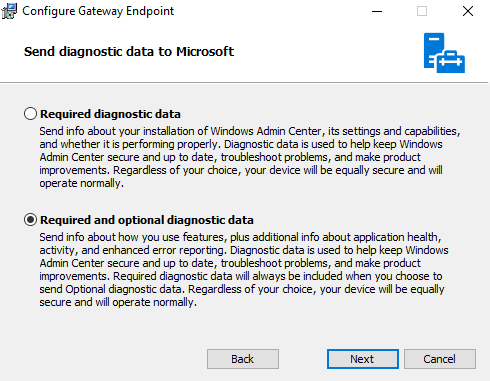
In sending diagnostic data you can support Microsoft in improving Windows Admin Center experience in future versions. Recommendation is to select “Required and optional diagnostic data” and click “Next”:

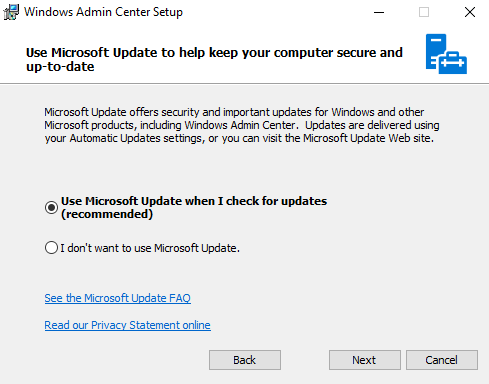
Recommendation is to select „Use Microsoft Update when I check for updates” to receive Windows Admin Center Updates automatically. Select this option and click on “Next”:
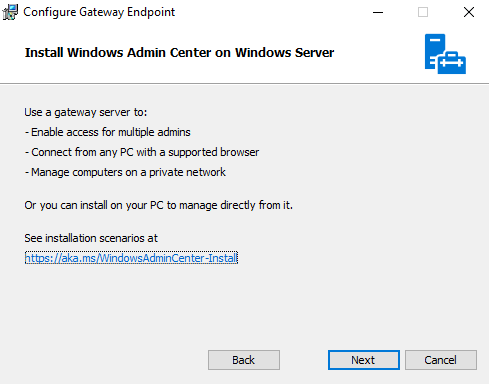
Windows Admin Center setup will recognize your setup type. In this setup guide we are focused on installing on a dedicated management server. Read the information carefully and click “Next”:
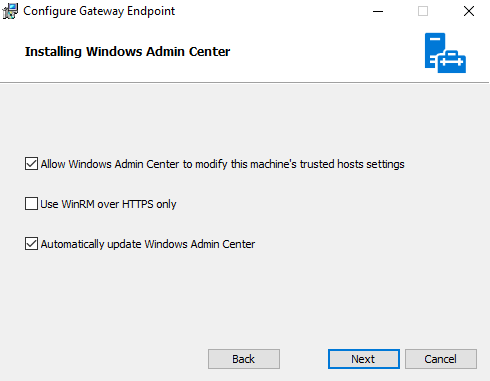
In the next step you should select “Allow Windows Admin Center to modify this machine’s trusted host settings”. If you don’t select this option, you must manually edit the trusted host settings. The setting for “Use WinRM over HTTPS only” depends on your organizations security policy. In this guide we will leave the default value this means this option is unchecked. Recommendation is to select “Automatically update Windows Admin Center” and click “Next”:
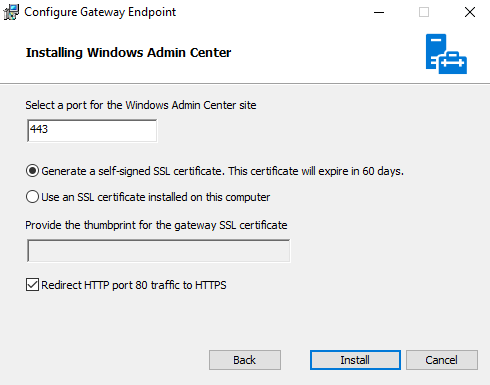
The default port for the Windows Admin Center Gateway Installation is Port 443 – it is recommended to use this default port. It is also recommended to use a valid certificate from an external or internal certificate authority. For testing you can use the option “Generate a self-signed SSL certificate.” Please keep in mind: this certificate will expire in 60 days after generating it. You can change the certificate in starting the Windows Admin Center setup again and selecting “Change settings”. Select the option “Redirect HTTP port 80 traffic to HTTPS” to ensure that independently if you enter “http” or “https” you will be directed to the Windows Admin Center web page. Click “Install” in this final step:

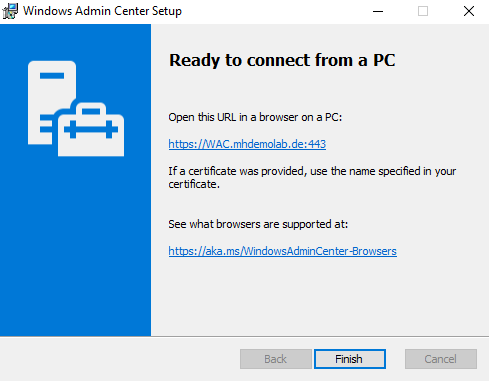
When Windows Admin Center setup finished successfully you will se the URL to your Windows Admin Center site. Click on the link displayed below “Open this URL in a browser on a PC:” or enter this URL in your browser. Supported browsers are Microsoft Edge and Google Chrome. Mozilla Firefox is not tested but should work. Recommendation of the author of this article is to use Microsoft Edge Browser in the latest version. The next steps in this article are based on screenshots in Microsoft Edge:

Open Windows Admin Center and configure settings
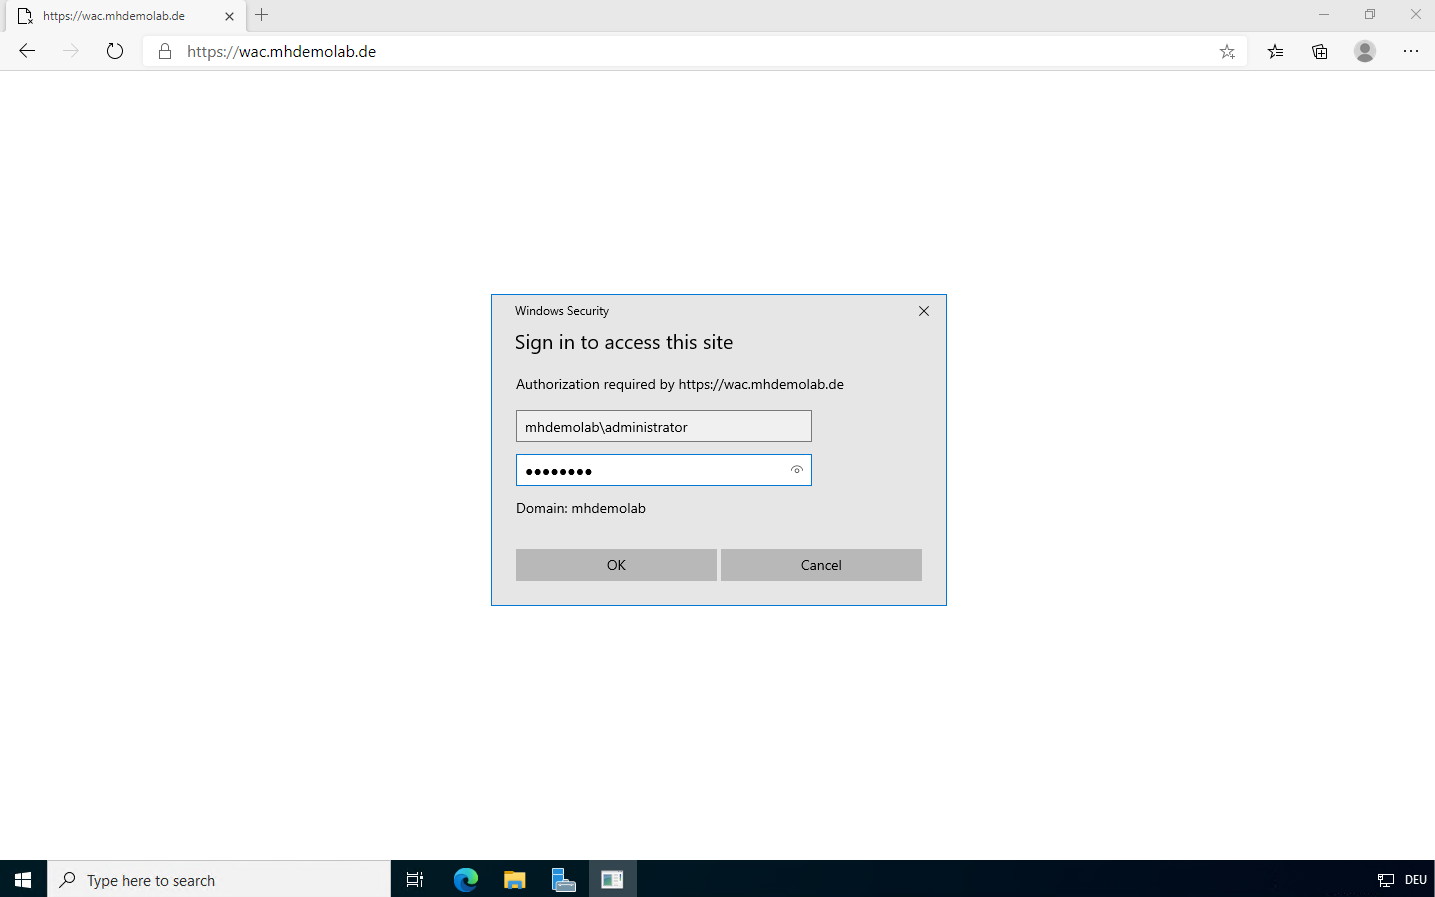
When the Windows Admin Center main page opens for the first time you will need to authenticate. Please use “YOURDOMAINNAME\ADMINISTRATIVE_USER” as username. In the next steps we will use “mhdemolab\administrator” in the lab environment:

When you login to Windows Admin Center for the first time you will se the new features in this release. You can read what´s new. After reading what´s new you can close this window:

Wait a few seconds till you can read “Extension catalogs are being updated” in the notification area in the upper right-hand corner:

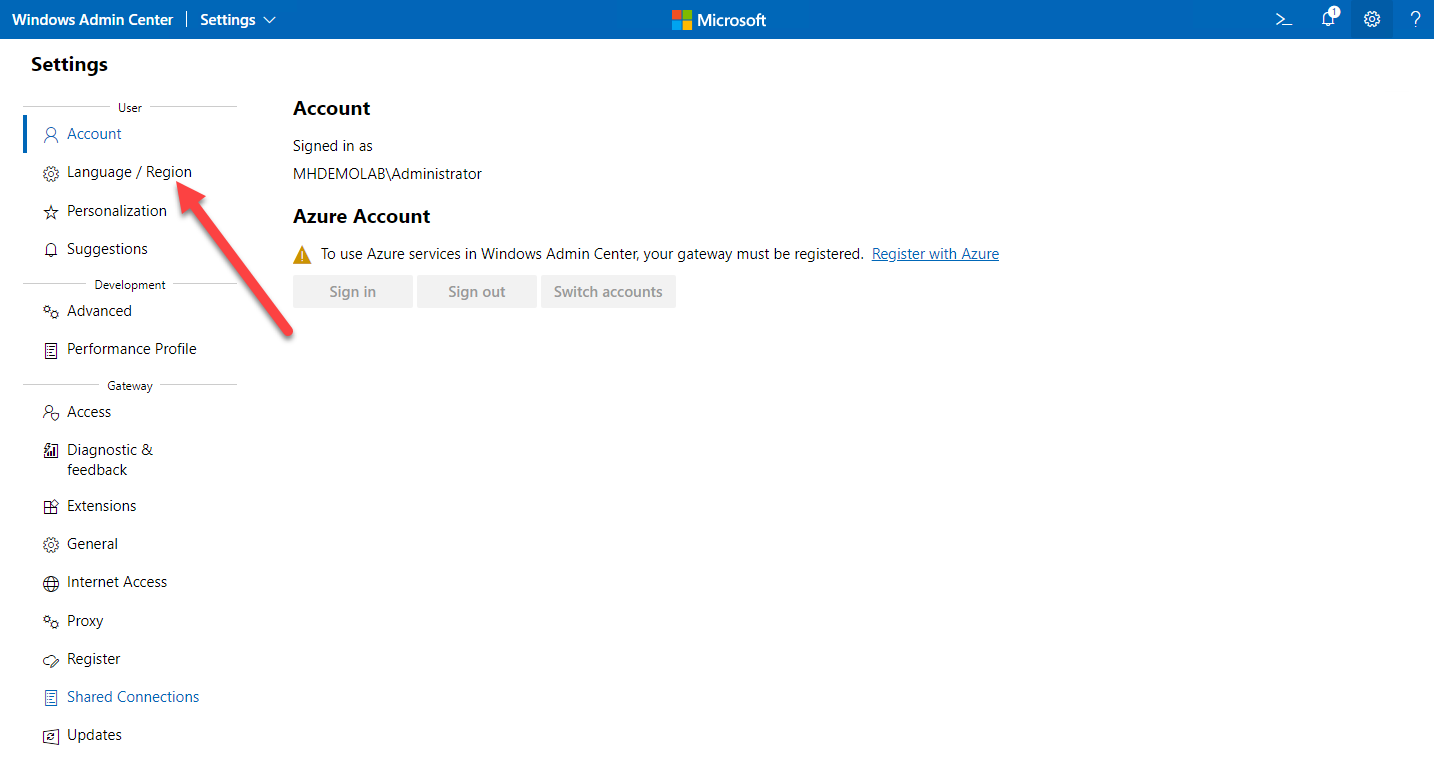
You are now on the Windows Admin Center main page. You will see your Windows Admin Center Gateway Server in the List of manageable systems. Click on the “Settings” icon (gear) on the upper right-hand corner:

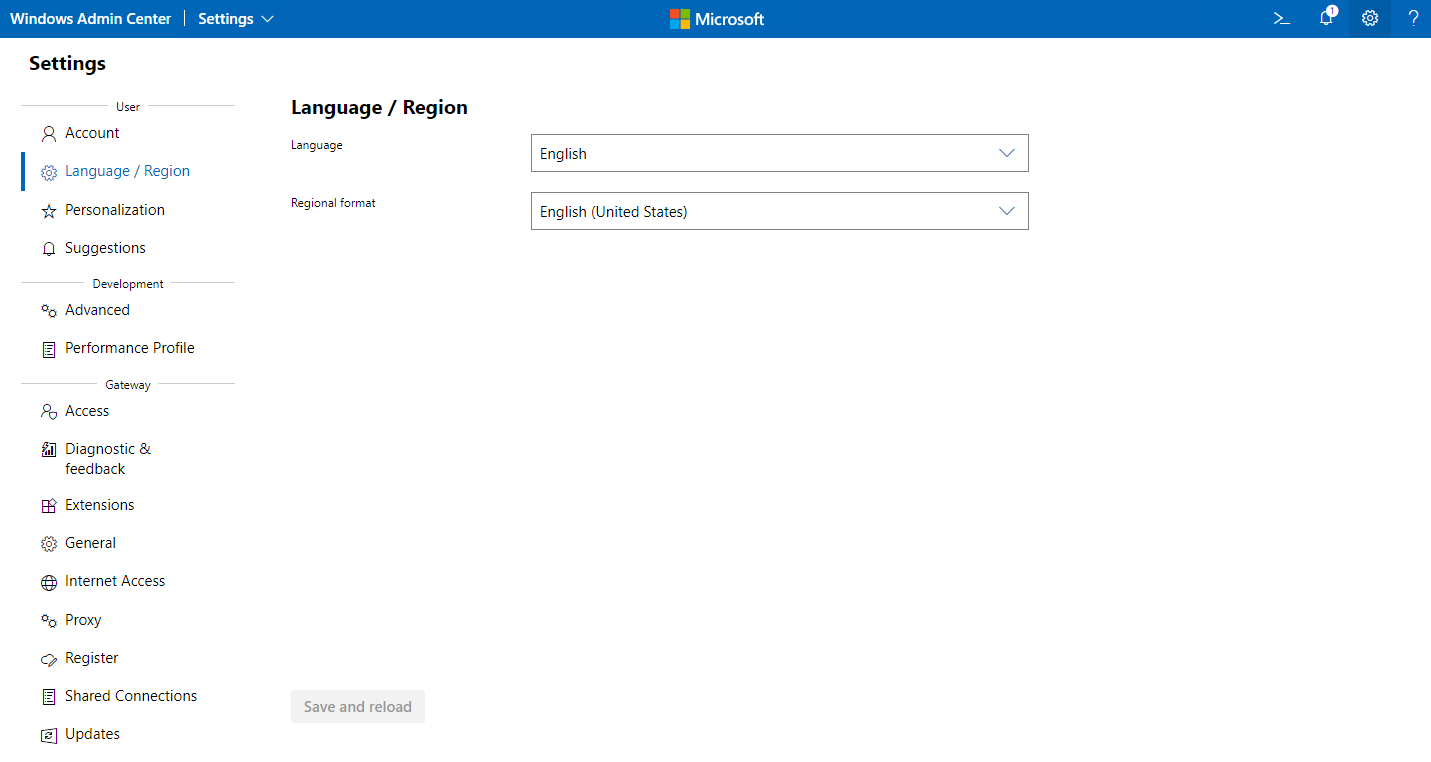
On the settings-page you will find all the relevant settings for your Windows Admin Center installation. First recommendation is to set the language to your preferred Language. Click on “Language / Region” in the “Settings” List:

My recommendation is to choose here “English” for the language because many documentations about Windows Admin Center is written in English Language:
Choose your preferred Language and click on “Save and reload” on the bottom of the screen.
If your network uses a proxy server for internet access you can configure the proxy server in the “Gateway” section in the settings list:

After configuring your Proxy settings click on “Apply”. If do not use a Proxy Server on your network don’t change here anything.
You can run Windows Admin Center without internet connectivity. Without internet connectivity there are some limitations:
- You cannot install any Extensions directly from the Extension feed – but you can manually side-load Extensions
- You cannot use any of the hybrid features in the Windows Admin Center hybrid center
- You cannot use internet related things like Windows Update Management
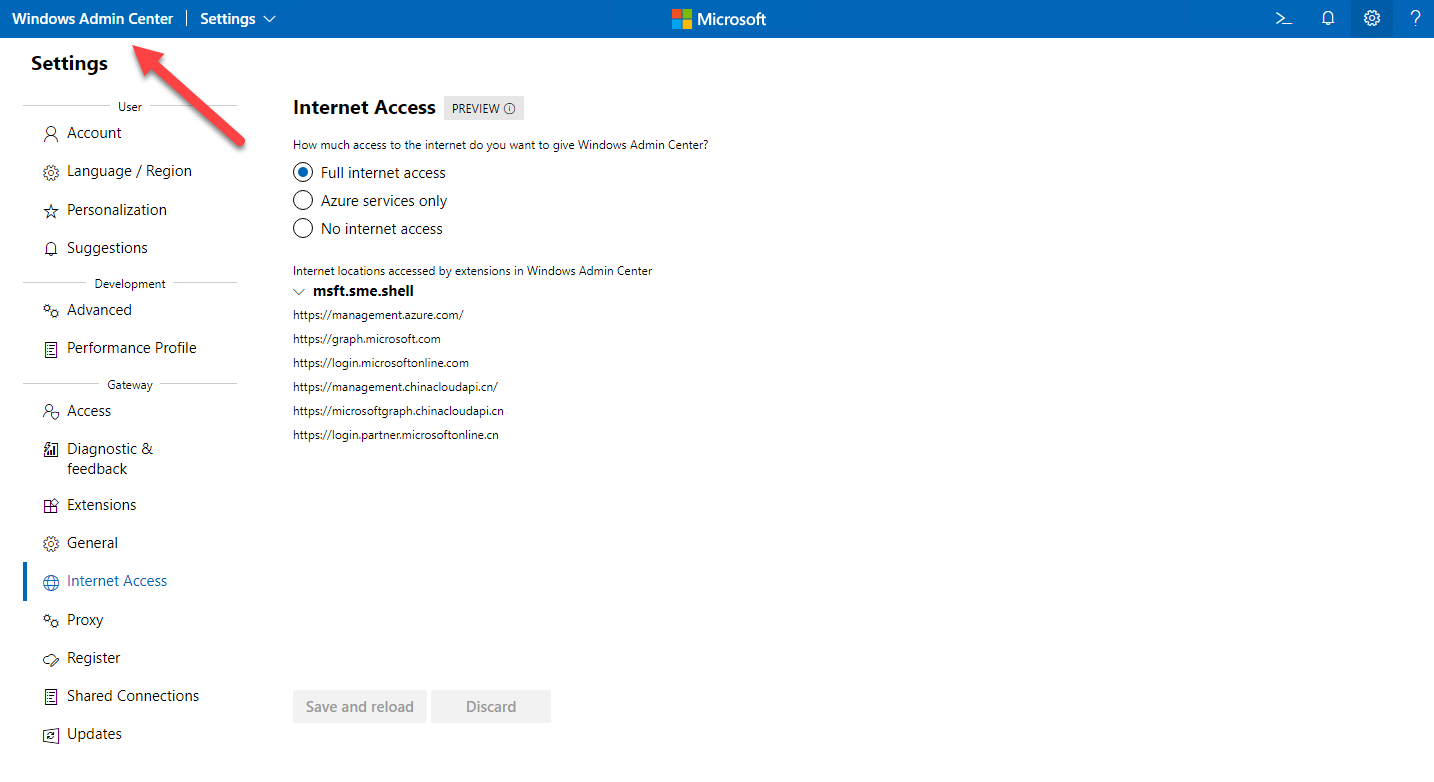
In the “Gateway” section in the “Settings” list you can configure three different Internet Access Options via clicking on “Internet Access”:

Recommendation is to choose “Full internet access”. If you choose “Azure services only” you can configure and access the Azure hybrid services via Windows Admin Center but no other internet services. When you select “No internet access” you will have the limitations mentioned above. If your internet access policy allows, please select “Full internet access” and click on “Save and reload”.
Now click on the text “Windows Admin Center” on the upper left-hand corner:
Add Servers to Windows Admin Center
This will bring you back to the main Windows Admin Center page. On the upper right-hand side, you will see four icons.
We already used the “Settings” gear.
The question mark (?) will show you information about your Windows Admin Center Version and support options. You should always ensure to use the latest Windows Admin Center Version.
Via the “PowerShell” Icon (>_) which PowerShell Cmdlets are triggered with your specific action in Windows Admin center.
When you click on “Notifications” – the symbol is the bell jar – you can select between “All”, “Errors & warnings”, “Active” and “Info”. The “Notification” area is important because not every Windows Admin Center page shows the progress of your current activity. In the “Notification” area you can always see what happens in your Windows Admin Center Environment, which tasks where successful and where you ran into problems:
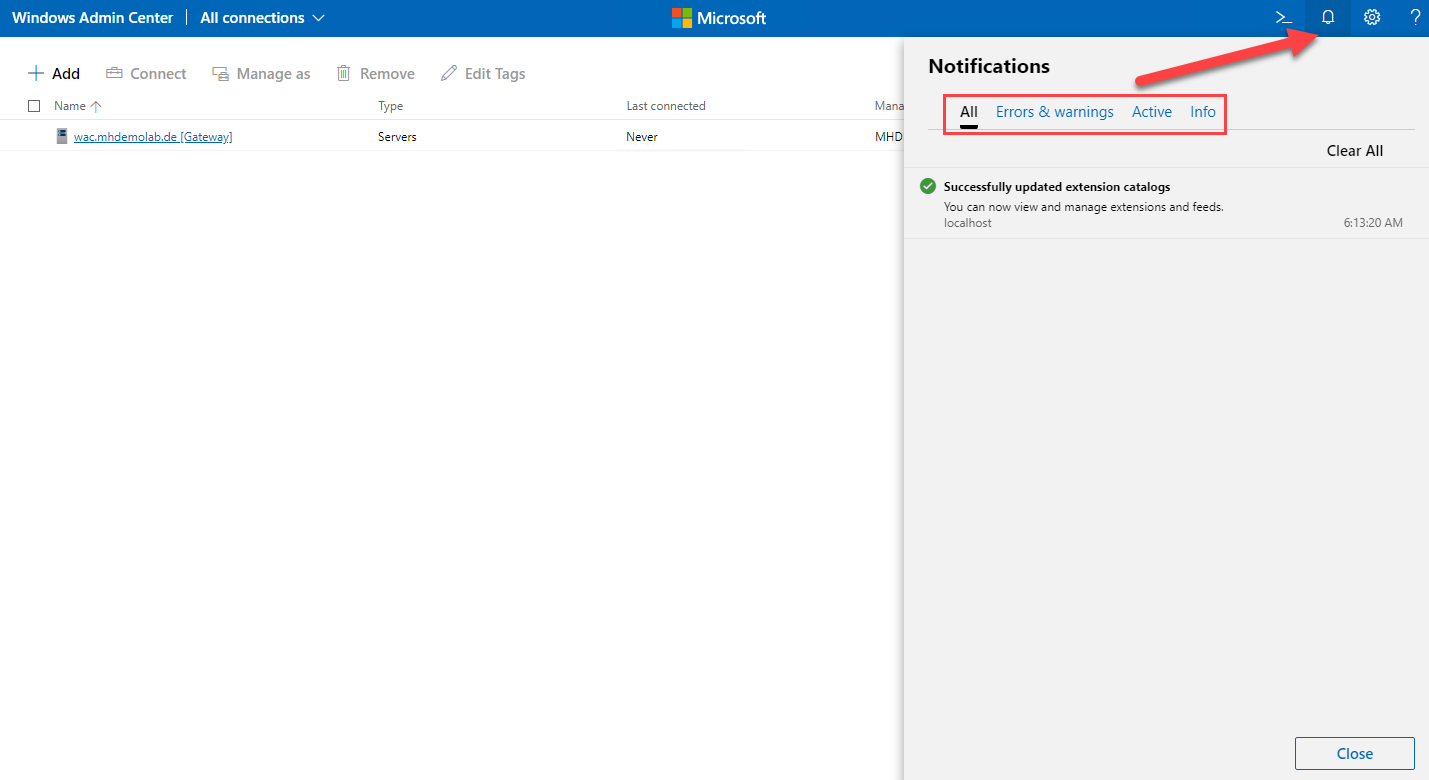
Now click on “Close”.
In the next step we will add servers on your network to the List of systems managed by Windows Admin Center.
Click on “+ Add” on the upper left-hand corner on the Windows Admin Center main page:

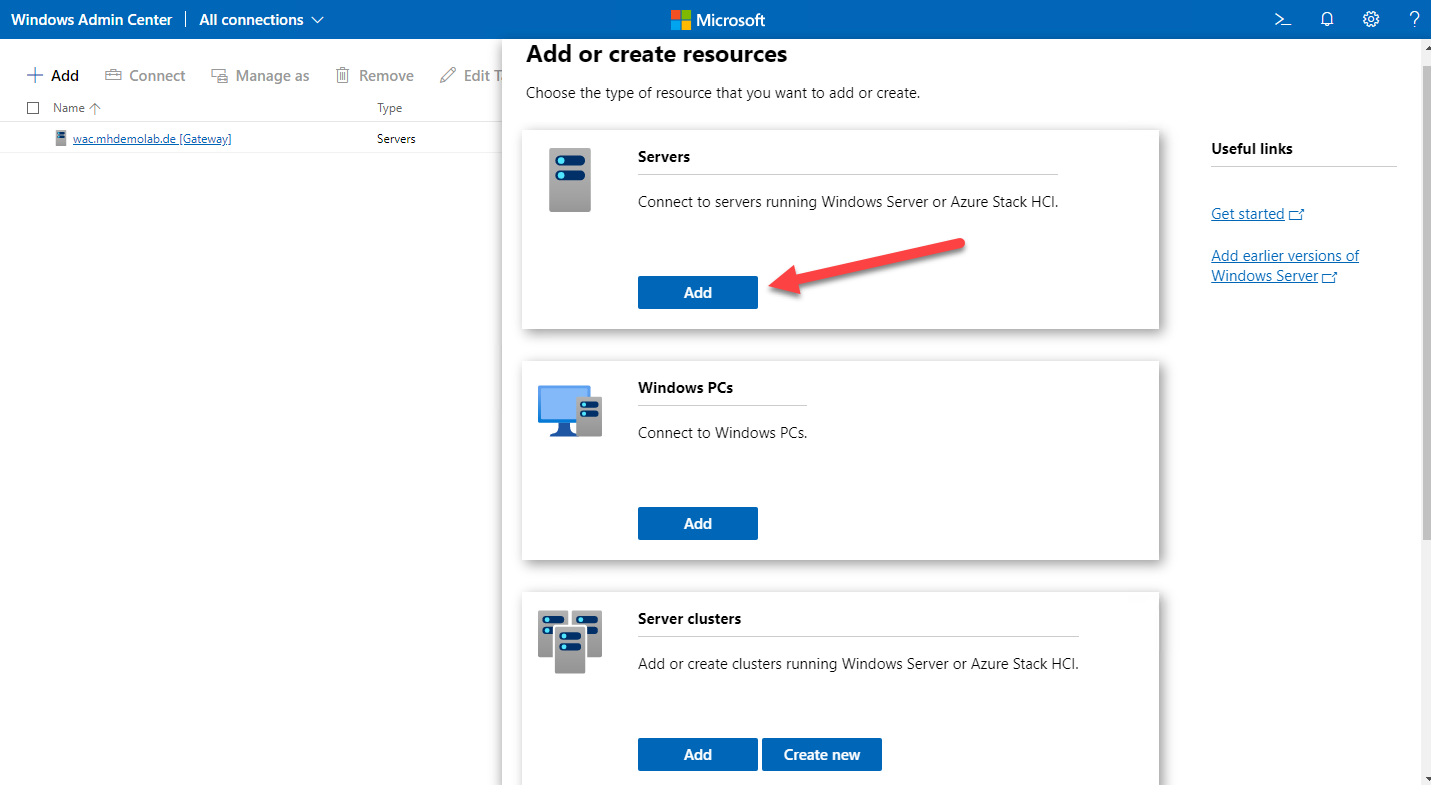
There are several different resources you can add to Windows Admin Center or create in Windows Admin Center for management:
- “Servers” can be Windows Server 2016 or later without installing anything on the target server. Windows Server 2012 and 2012 R2 can also be added to Windows Admin Center if you install Windows Management Framework (WMF) 5.1 on the target servers.
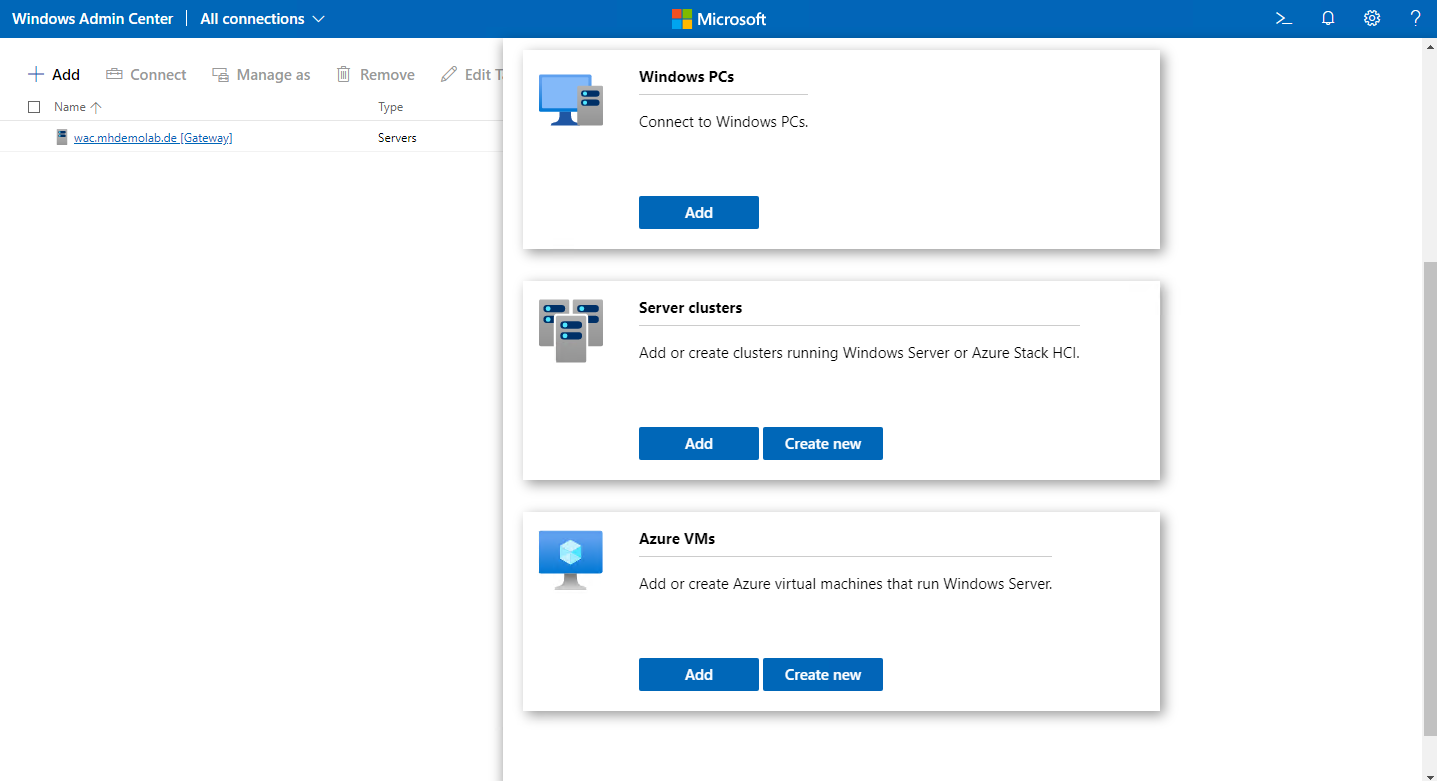
- “Windows PCs” can be any supported version of Windows 10 or Windows 11 for business customers.
- Server Clusters can be any supported version of Windows Server or Azure stack HCI. You can add existing clusters or create new clusters.
- “Azure VMs” allows you to add existing VMs in your Azure subscription or create new VMs in Azure.
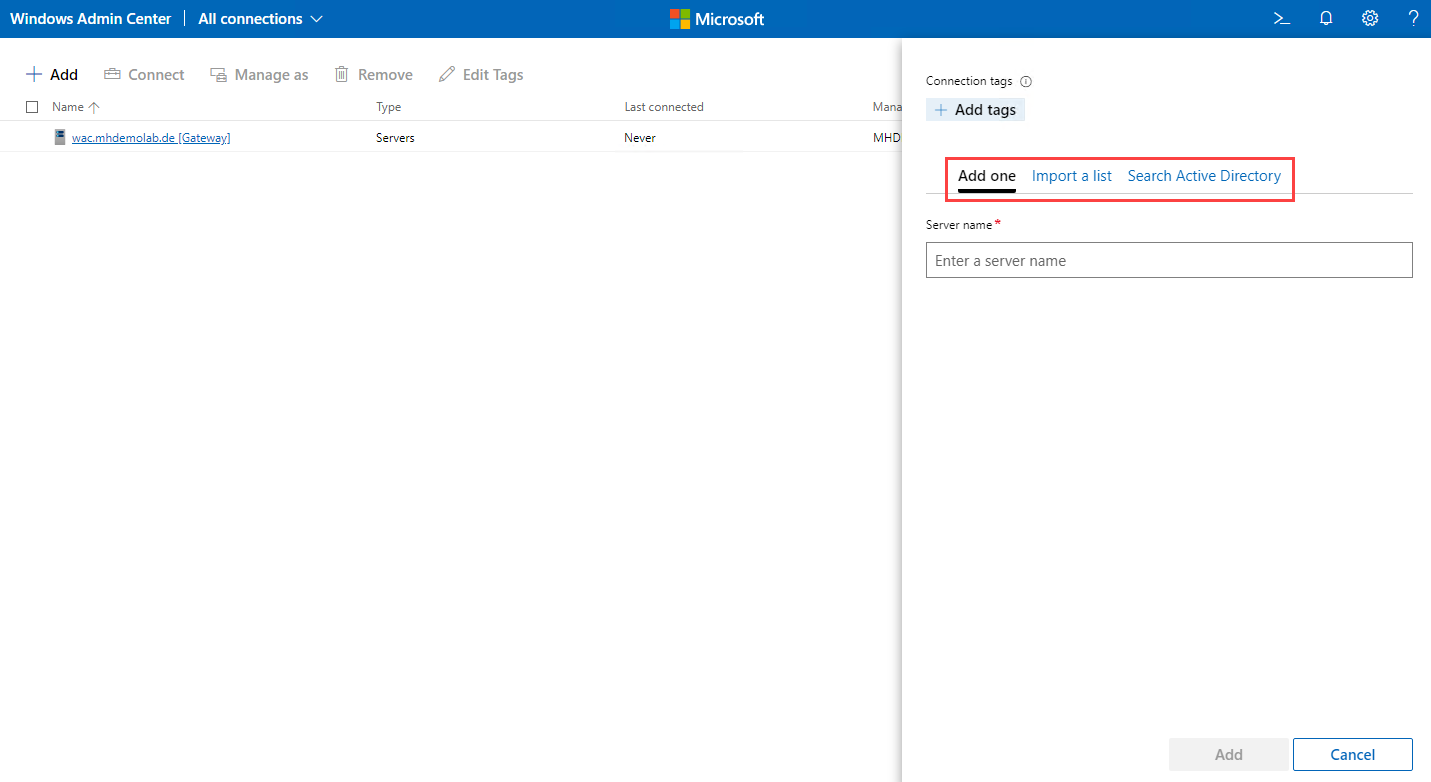
We will add existing servers on the domain network in the next step, so click on “Add” in the “Servers” section:
You can add single servers by typing their name in “Add one”, import servers by selecting a list of servers in “Import a list” or brows for existing servers in your Active Directory by clicking on “Search active Directory”.

We will use “Search Active Directory” to add several servers from the Active Directory to the list. In the search field you can add an asterisk as wildcard. You can directly start with an asterisk to list all computers from your active directory. In the following screenshot I entered “D114*” because I know in my demo-environment al relevant computers have a prefix “D114” – so I can only list these. In this list you can select on e or more target-computers by checking the checkbox in front of the computer name. Please select the computers you want to manage with Windows Admin center and click on “Add”:
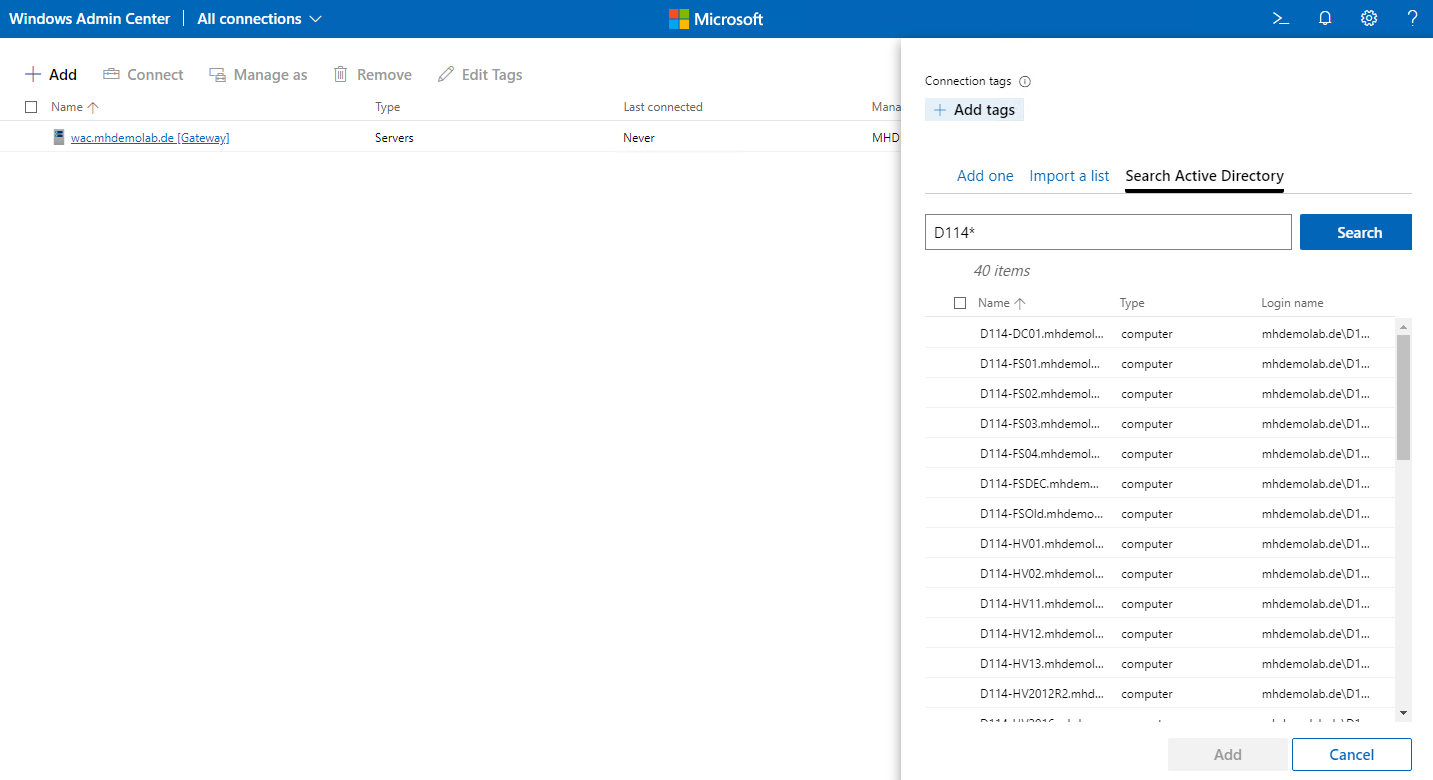
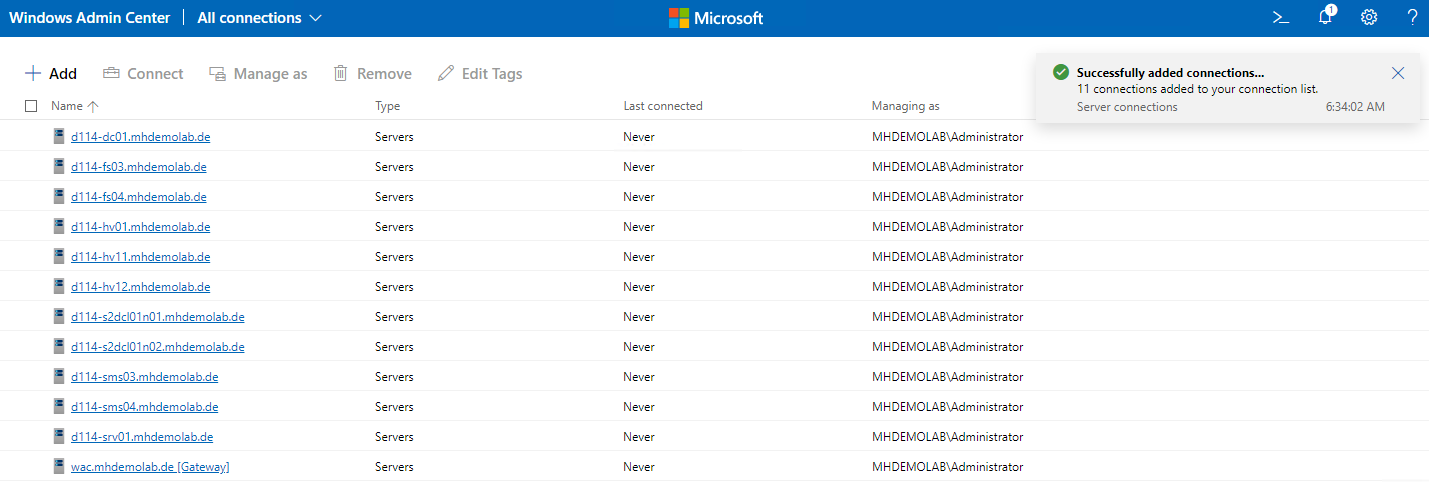
In the following screenshot you can see I added 11 connections to the list. It might happen that you need to reauthenticated. It might also happen you get a message displayed that says that one or more targets are not reachable. In this case you can decide to add them despite this, or you can try it later again. Because Windows Admin Center doesn’t install anything on the target it is possible to add targets to the connection list that are not reachable. Keep in mind. There is no verification for non-reachable targets.

First steps in managing Windows Server with Windows Admin Center
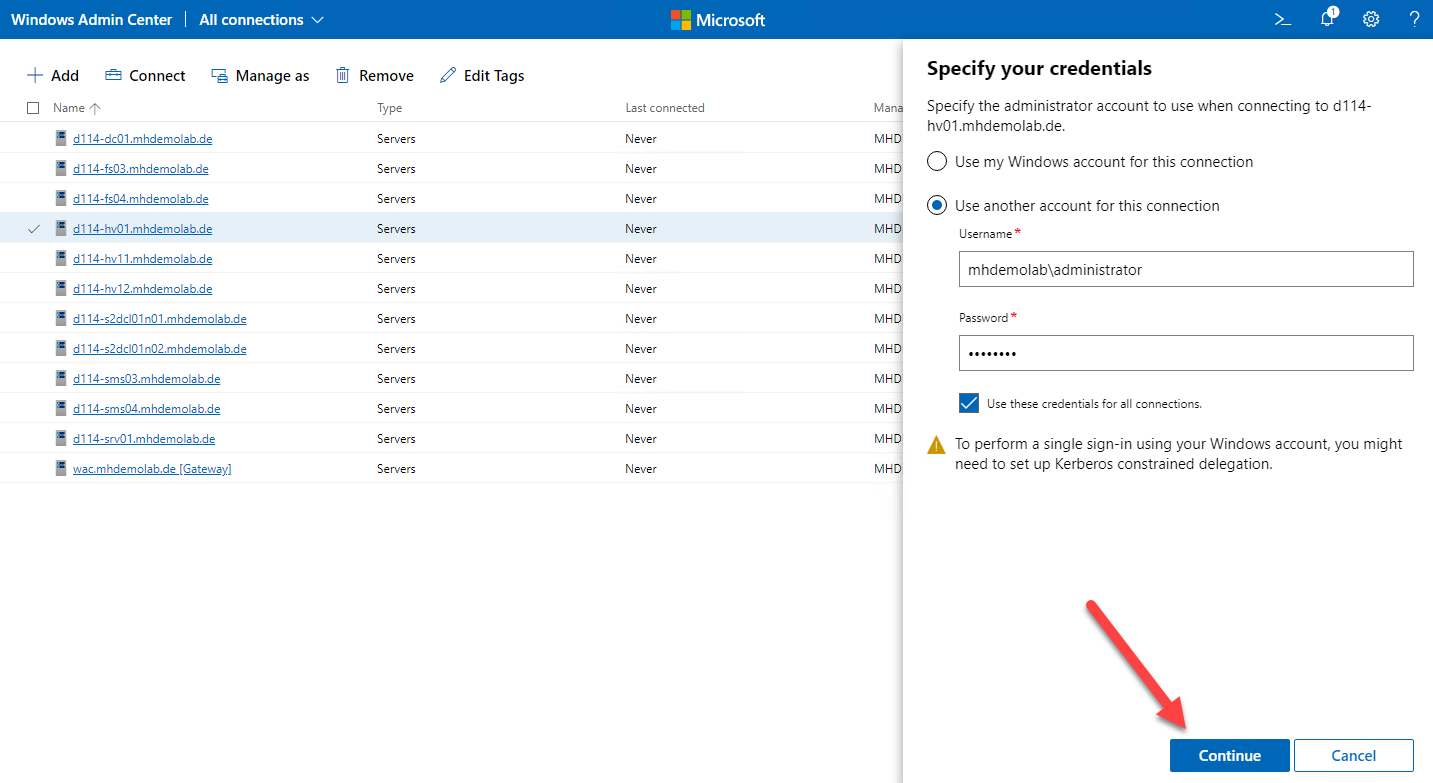
Let’s have a look on one of the targets and check the available management options in Windows Admin Center. Klick on one of the servers you added to the connections-list. Because it is your first connection to one of these new servers you must enter credentials with administrative privileges on the target:

You can select “Use my Windows account for this connection” or “Use another account for this connection”. Select the option “Use another account for this connection” and enter credentials with administrative privileges on the target – then click “Continue”:

Now the overview page for the selected system opens. If you connect to a client or cluster, you will see different options on the Overview page. Different servers can also show different options depending on if they are configured as Domain Controller, Fileserver, Hyper-V host or other services.
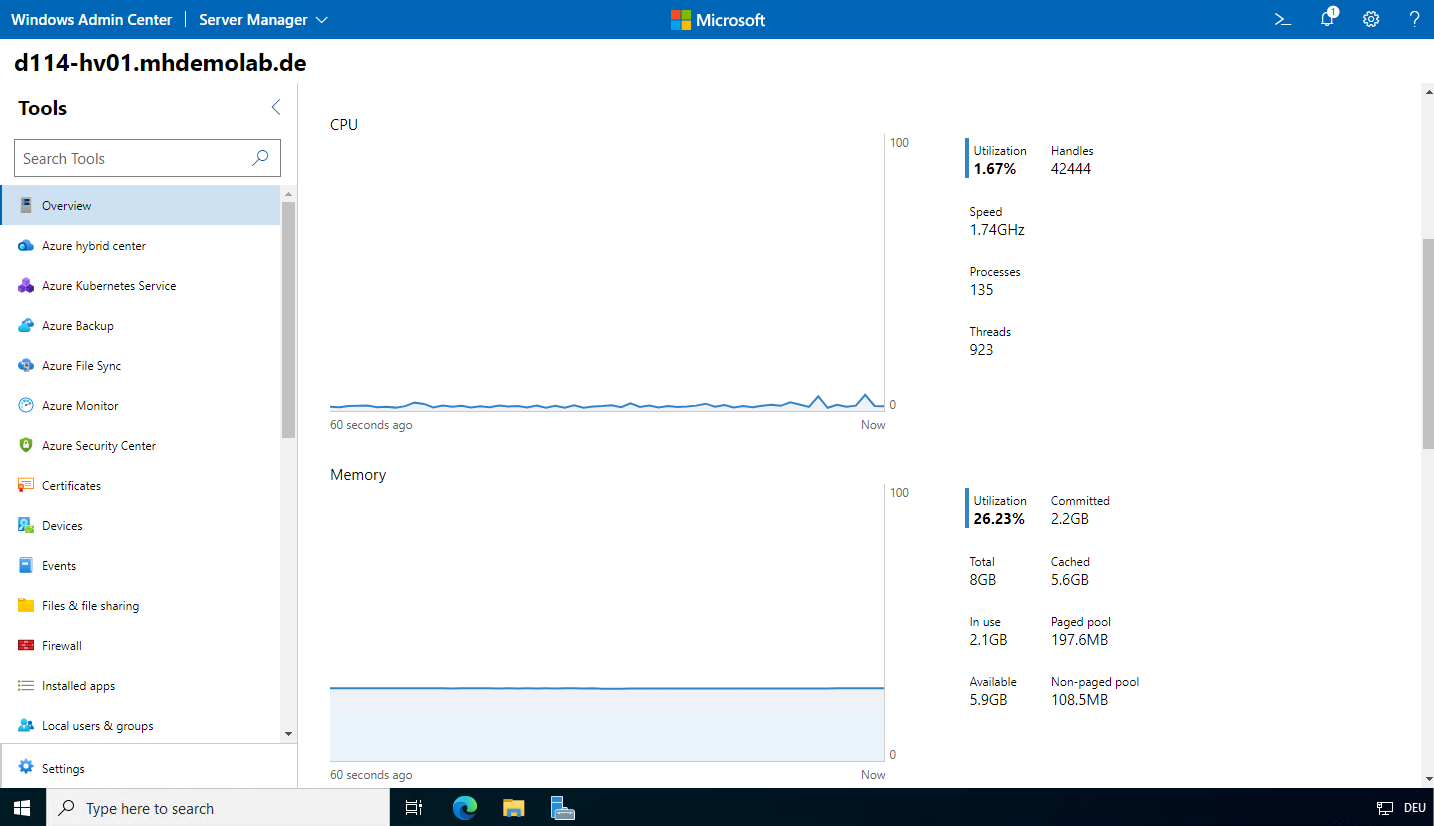
My selected Server “d114-hv01” is a Windows Server 2022 Datacenter target configured as Hyper-V host:
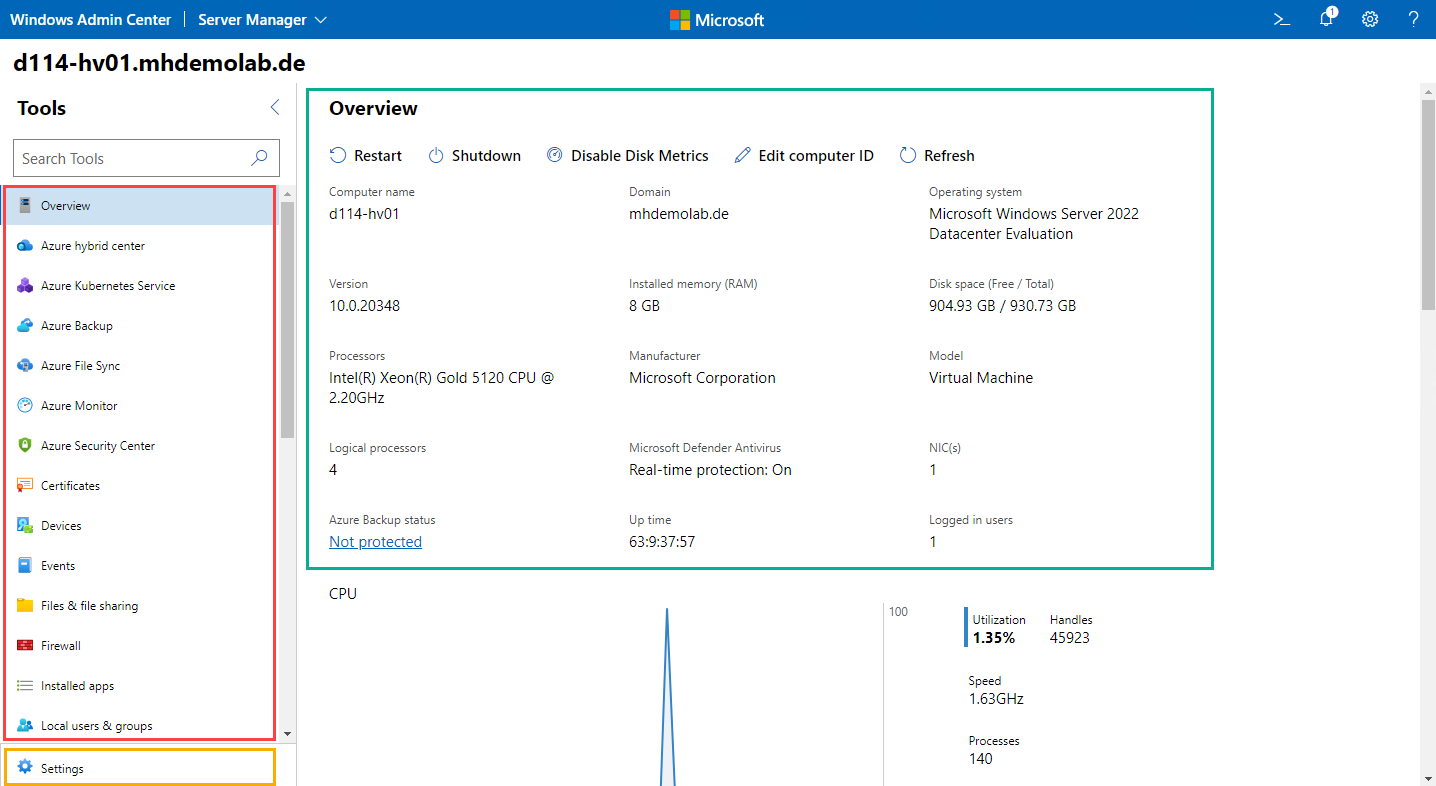
On the left-hand side you will find the tools-list (red box). Below the tools-list you will find the server settings. In the main-area (green-box) you will find the details – depending on which tool you selected. Let’s first have a look at the “Overview” page – here you will find information about this server like version and edition, memory, CPU and much more. When you scroll down you will see the usage of your resources on this server:

Let’s have a look at some of the tools. First select “Roles & features” – here you can install and uninstall roles and features on the selected server:

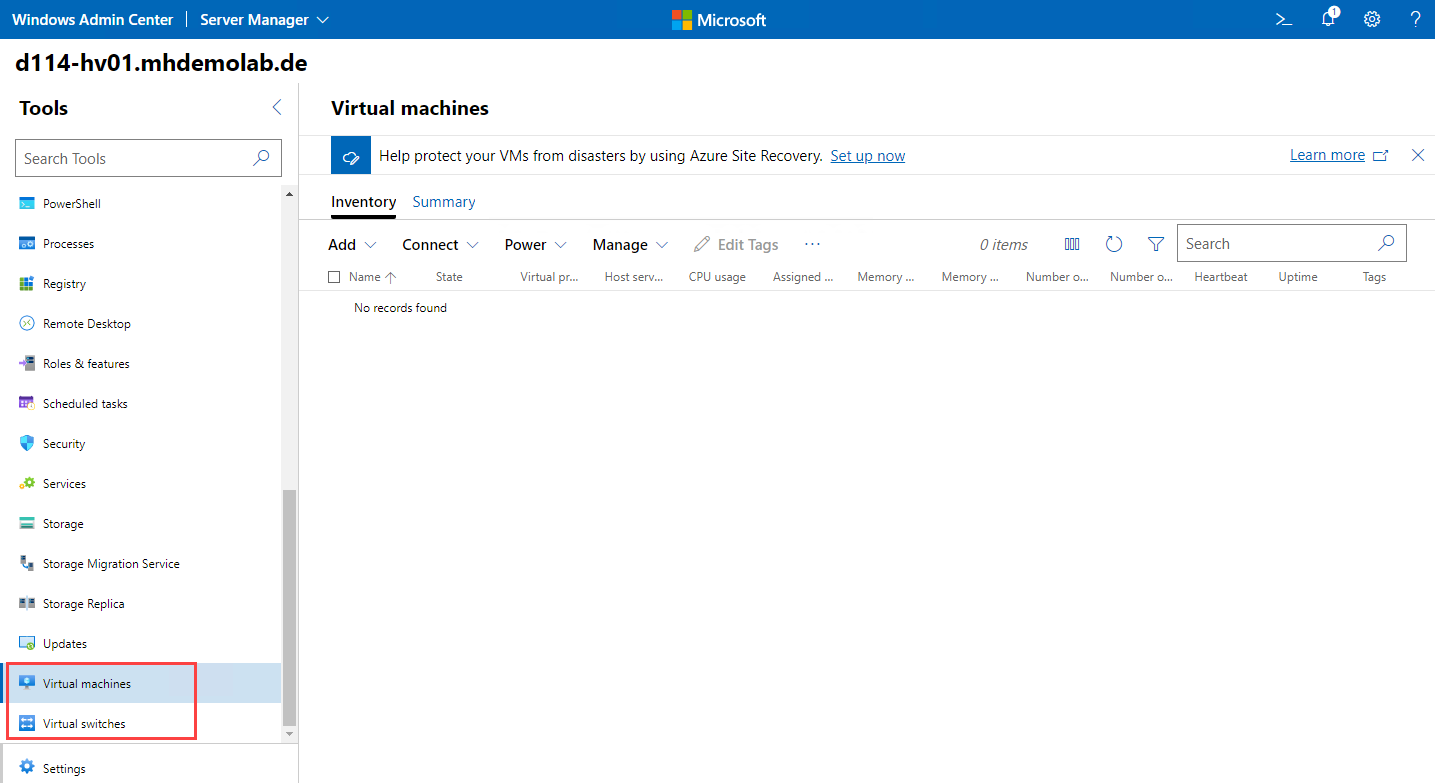
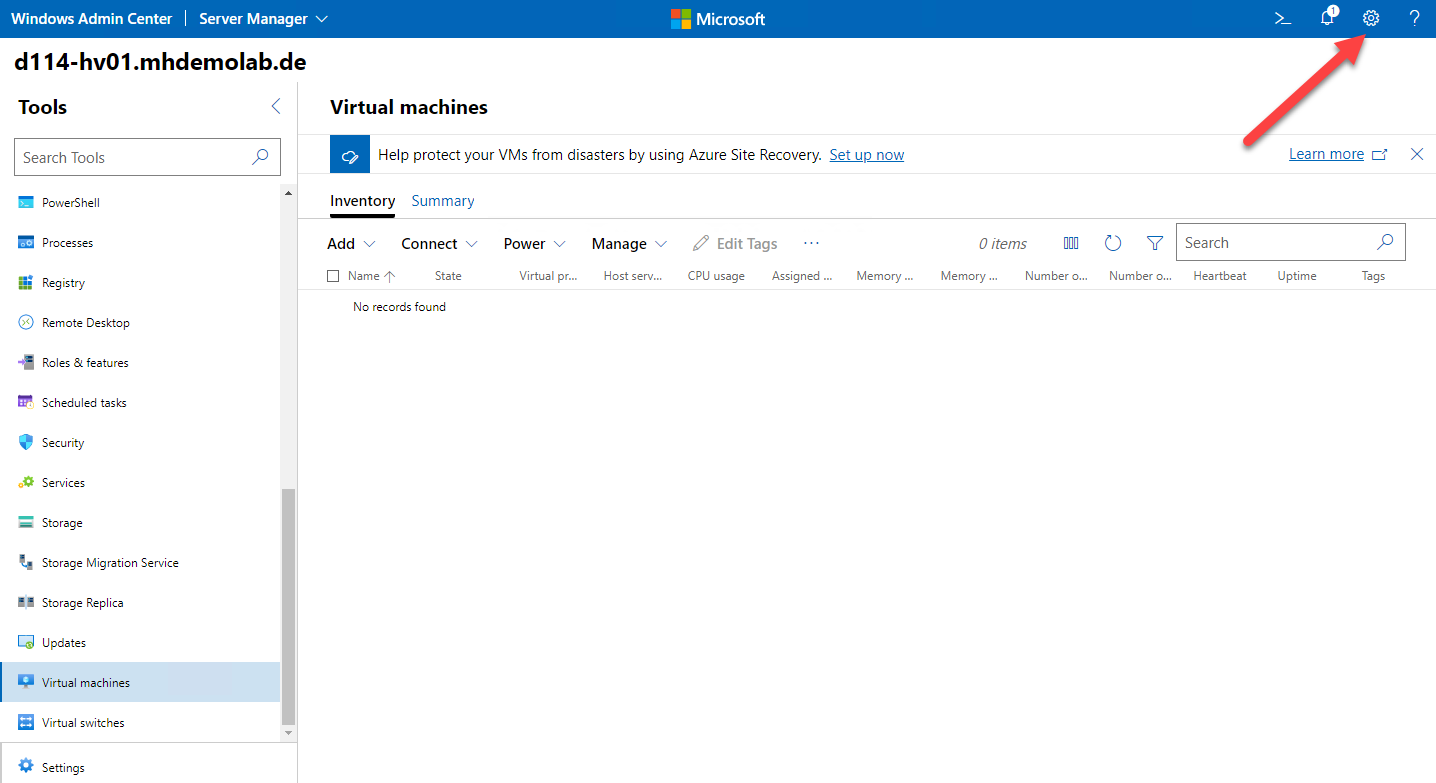
If your server is also a Hyper-V host, you will find “Virtual machines” and “Virtual switches” in the tools list. When you click on “Virtual machines” you will see a page where you can add new VMs, connect to existing virtual machines, power on and off virtual machines and manage virtual machines:
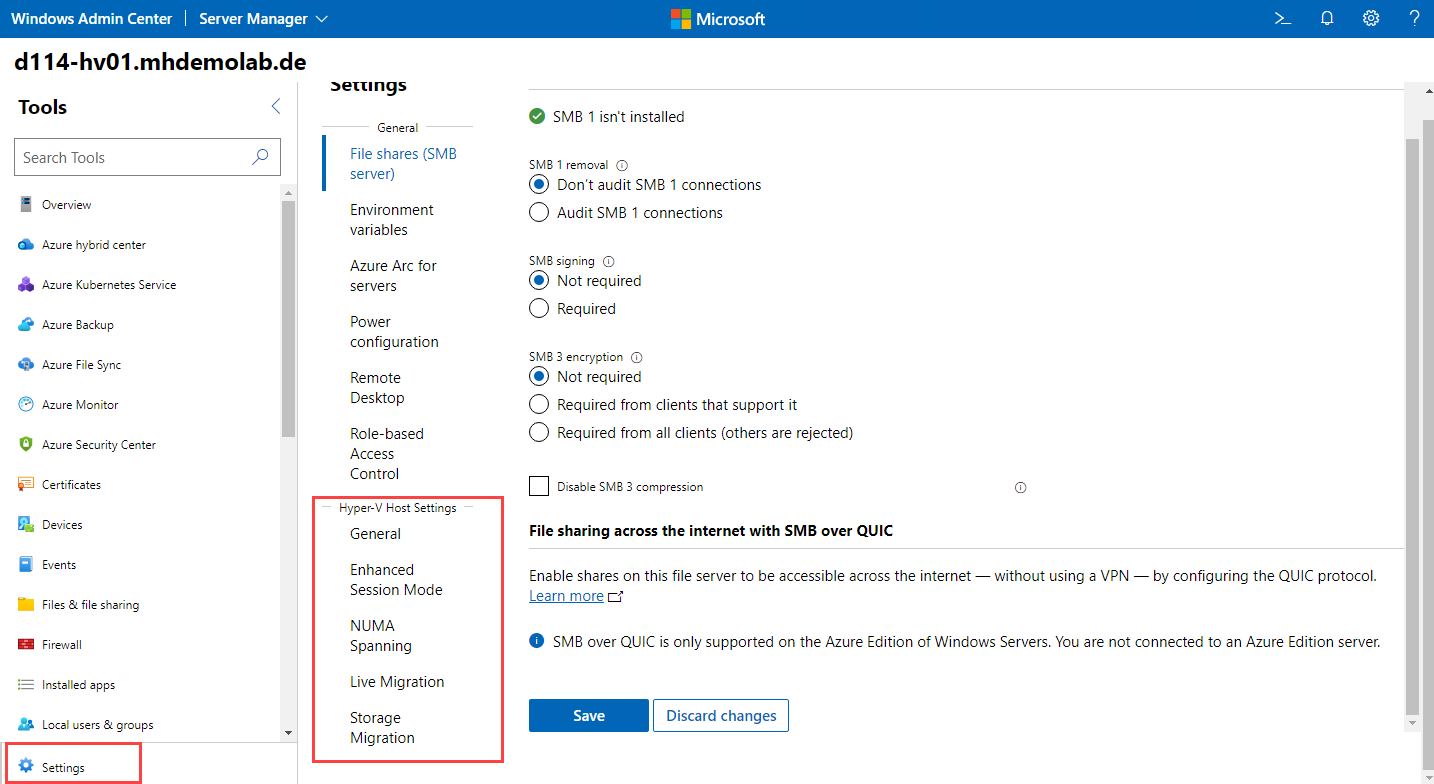
Now select “Settings” below the tools list. In the “General” settings you can configure general server settings like SMB, Azure Arc for servers, Power configuration and Remote Desktop:
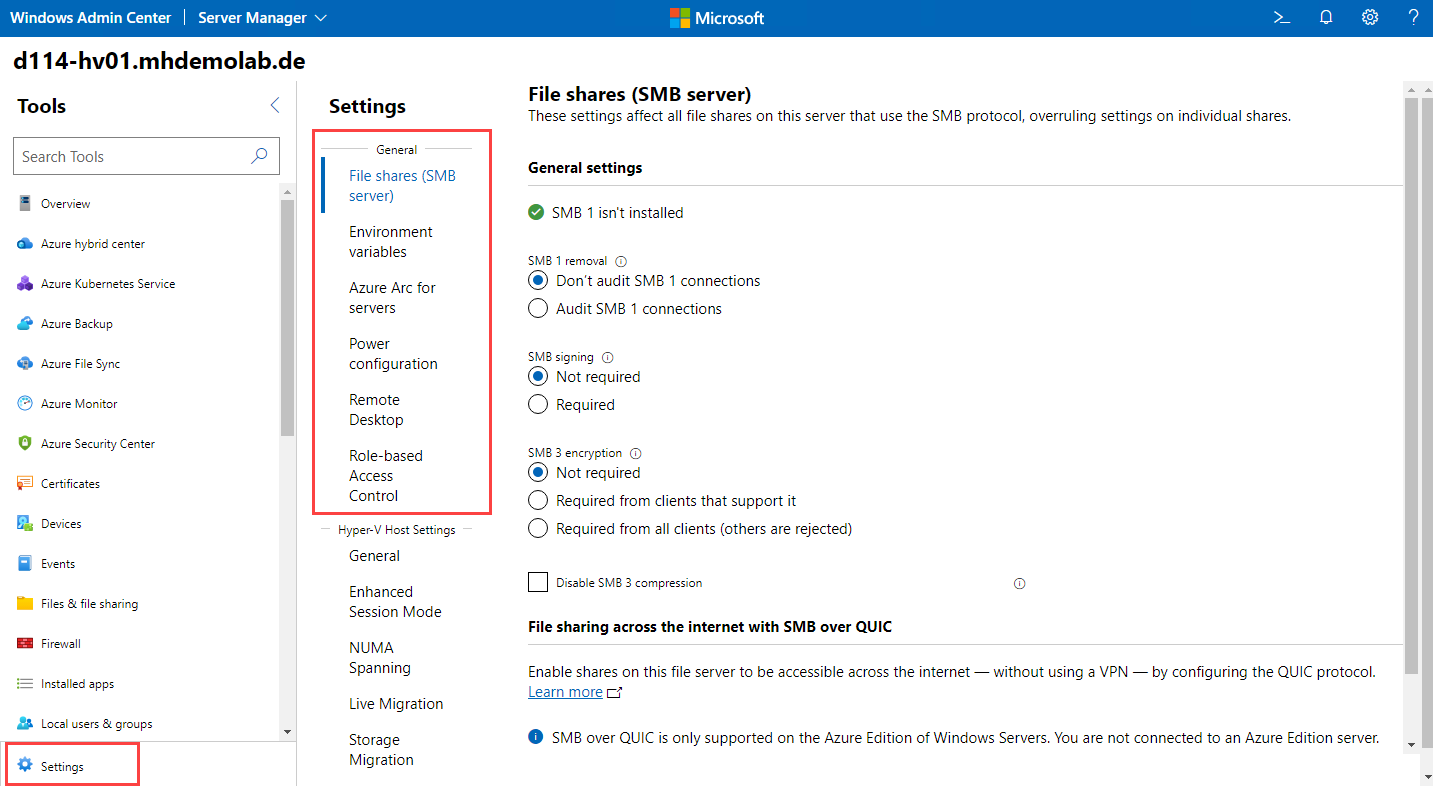
In the section “Hyper-V Host Settings” you will find the Hyper-V specific settings if your host is configured as Hyper-V Host. Here you find settings like Enhanced Session Mode, Live Migration and Storage Migration:
You should take some time to get familiar with the different tools and available configuration options. If you use Windows Admin Center for the first time you will be surprised how powerful these configuration options are.
Installing Extensions for Windows Admin Center
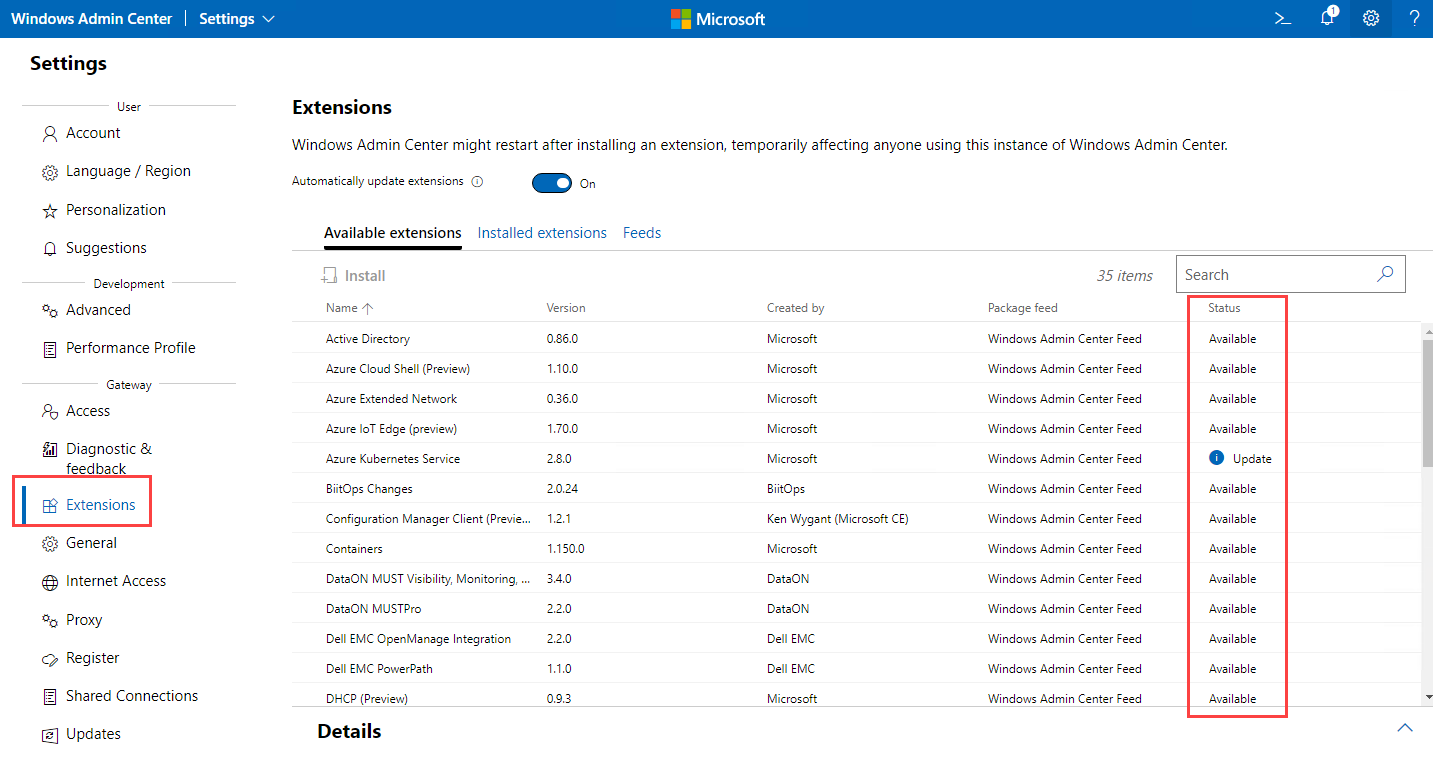
Windows Admin Center can also be extended with additional tools by installing Extensions. Extensions are available by Microsoft and 3rd party hardware and software partners. To install extensions, click on the settings icon (gear) on the upper right-hand corner:
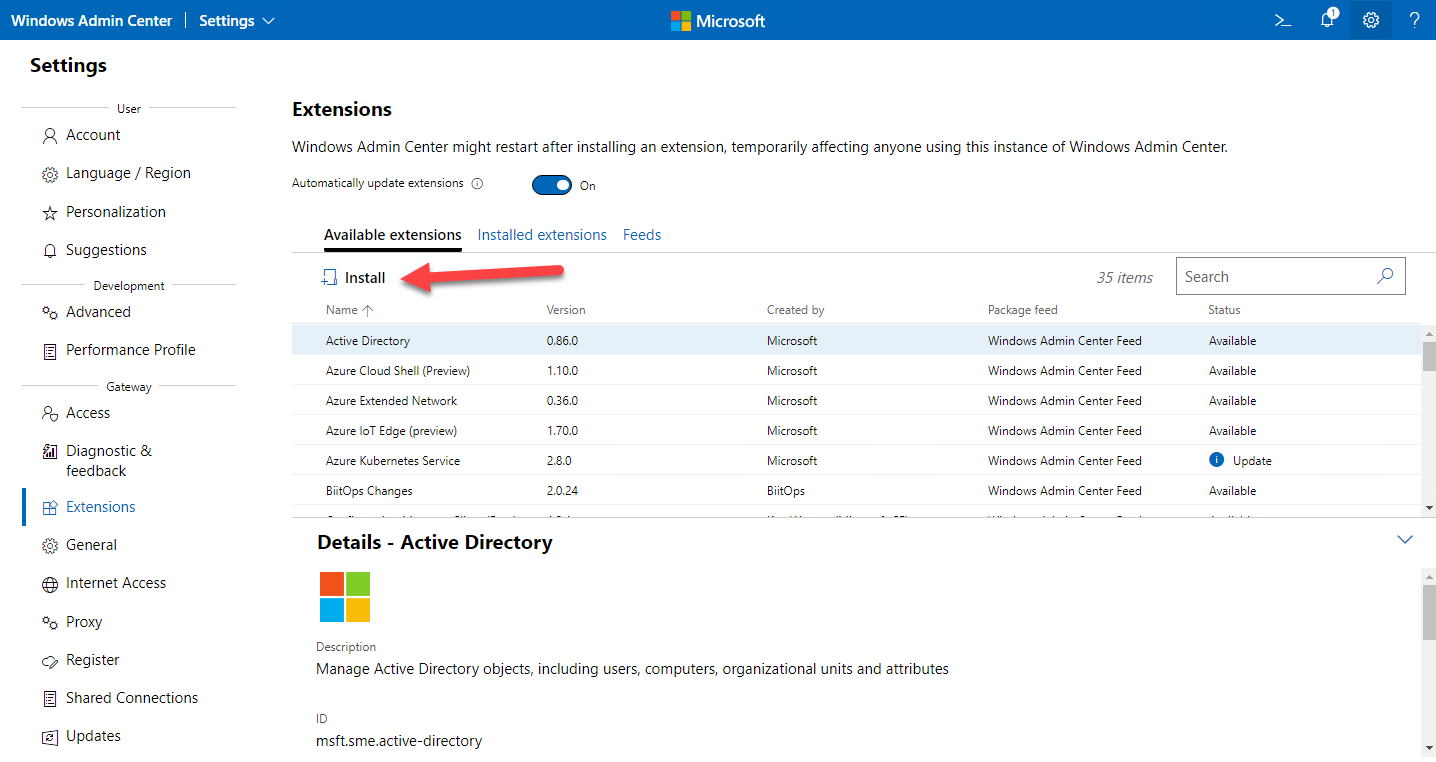
On the “Settings” page click on “Extensions” to see a list of available Extensions. You will see Extensions with different information in the “Status” column. “Update” means you have the Extension already installed and there is a newer version available. “Available” means this is an available extension in the public extension feed you have not installed on this Windows Admin Center. You can upgrade an existing extension or install a new extension in selecting the extension in the list and then clicking on “Install”:

I will select “Active Directory” in the next step and then click on “Install”:
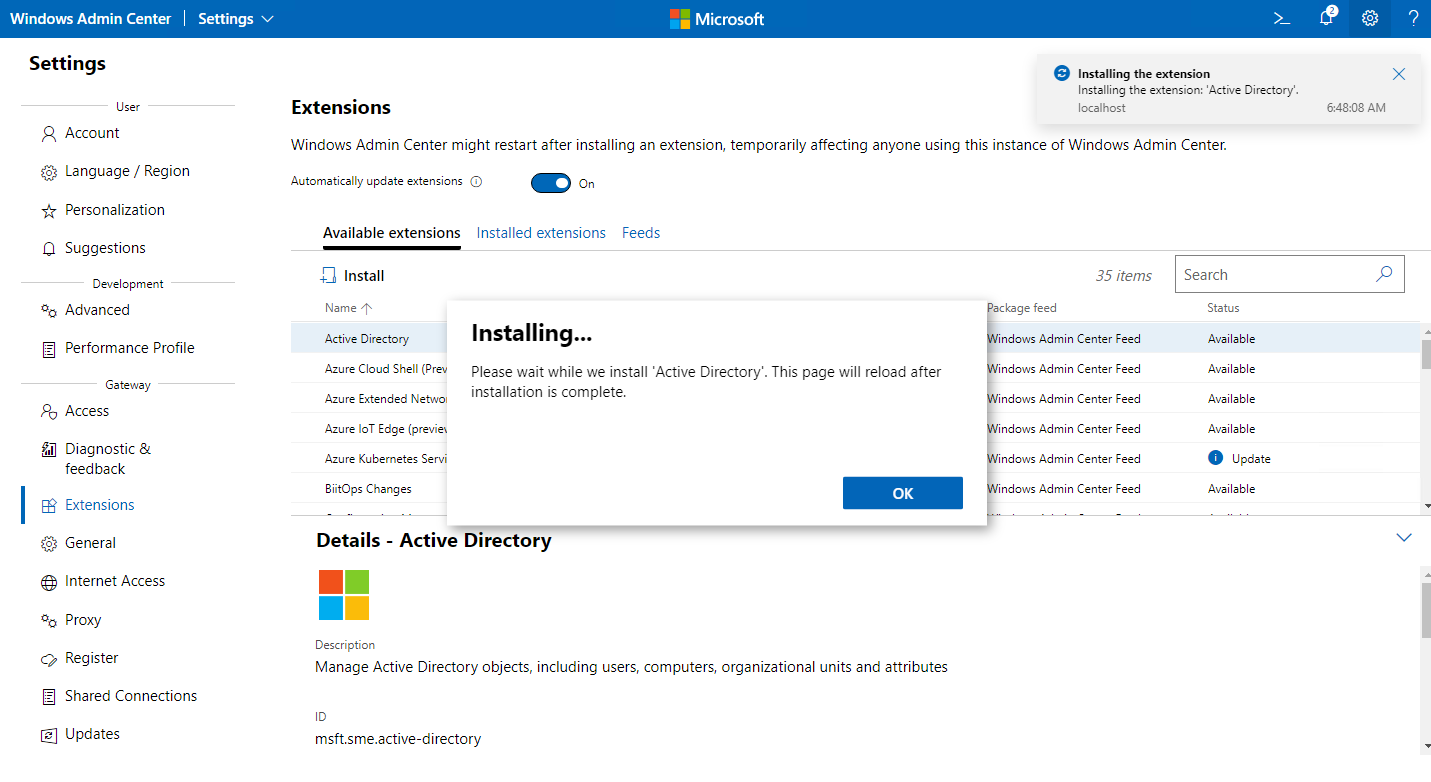
The Active Directory extension now will be installed:
You can now use the Active Directory Extension when you connect to a Domain Controller in your environment. Take some time to have a look at the other available extension. The OEM Extensions from Windows Server hardware partners are also very interesting.
This Step-by-step guide was written by:
Manfred Helber
Microsoft Most Valuable Professional (MVP) Cloud & Datacenter


Installing Windows Admin Center on Windows Server 2022
When you log-in to a Windows Server 2022 system and start Server Manager you will always se a Message recommending you use Windows Admin Center. The recommendation is using Windows Admin Center on your network and not to install it on every server:
When you click on the link you will see the Windows Admin Center documentation in your default browser. You can also access this documentation directly via: https://aka.ms/windowsadmincenter

You can download Windows Admin Center via the link in the documentation or via the direct link https://aka.ms/downloadWAC
Please fill out the registration form and download the installer for Windows Admin Center. The Windows Admin Center MSI package is small (~100 MB) and brings everything you need for installing and running Windows Admin Center. When the download has finished click on “Open file”
Select „I accept these terms” and klick next:

In sending diagnostic data you can support Microsoft in improving Windows Admin Center experience in future versions. Recommendation is to select “Required and optional diagnostic data” and click “Next”:
Recommendation is to select „Use Microsoft Update when I check for updates” to receive Windows Admin Center Updates automatically. Select this option and click on “Next”:

Windows Admin Center setup will recognize your setup type. In this setup guide we are focused on installing on a dedicated management server. Read the information carefully and click “Next”:

In the next step you should select “Allow Windows Admin Center to modify this machine’s trusted host settings”. If you don’t select this option, you must manually edit the trusted host settings. The setting for “Use WinRM over HTTPS only” depends on your organizations security policy. In this guide we will leave the default value this means this option is unchecked. Recommendation is to select “Automatically update Windows Admin Center” and click “Next”:

The default port for the Windows Admin Center Gateway Installation is Port 443 – it is recommended to use this default port. It is also recommended to use a valid certificate from an external or internal certificate authority. For testing you can use the option “Generate a self-signed SSL certificate.” Please keep in mind: this certificate will expire in 60 days after generating it. You can change the certificate in starting the Windows Admin Center setup again and selecting “Change settings”. Select the option “Redirect HTTP port 80 traffic to HTTPS” to ensure that independently if you enter “http” or “https” you will be directed to the Windows Admin Center web page. Click “Install” in this final step:
When Windows Admin Center setup finished successfully you will se the URL to your Windows Admin Center site. Click on the link displayed below “Open this URL in a browser on a PC:” or enter this URL in your browser. Supported browsers are Microsoft Edge and Google Chrome. Mozilla Firefox is not tested but should work. Recommendation of the author of this article is to use Microsoft Edge Browser in the latest version. The next steps in this article are based on screenshots in Microsoft Edge:
Open Windows Admin Center and configure settings
When the Windows Admin Center main page opens for the first time you will need to authenticate. Please use “YOURDOMAINNAME\ADMINISTRATIVE_USER” as username. In the next steps we will use “mhdemolab\administrator” in the lab environment:
When you login to Windows Admin Center for the first time you will se the new features in this release. You can read what´s new. After reading what´s new you can close this window:

Wait a few seconds till you can read “Extension catalogs are being updated” in the notification area in the upper right-hand corner:
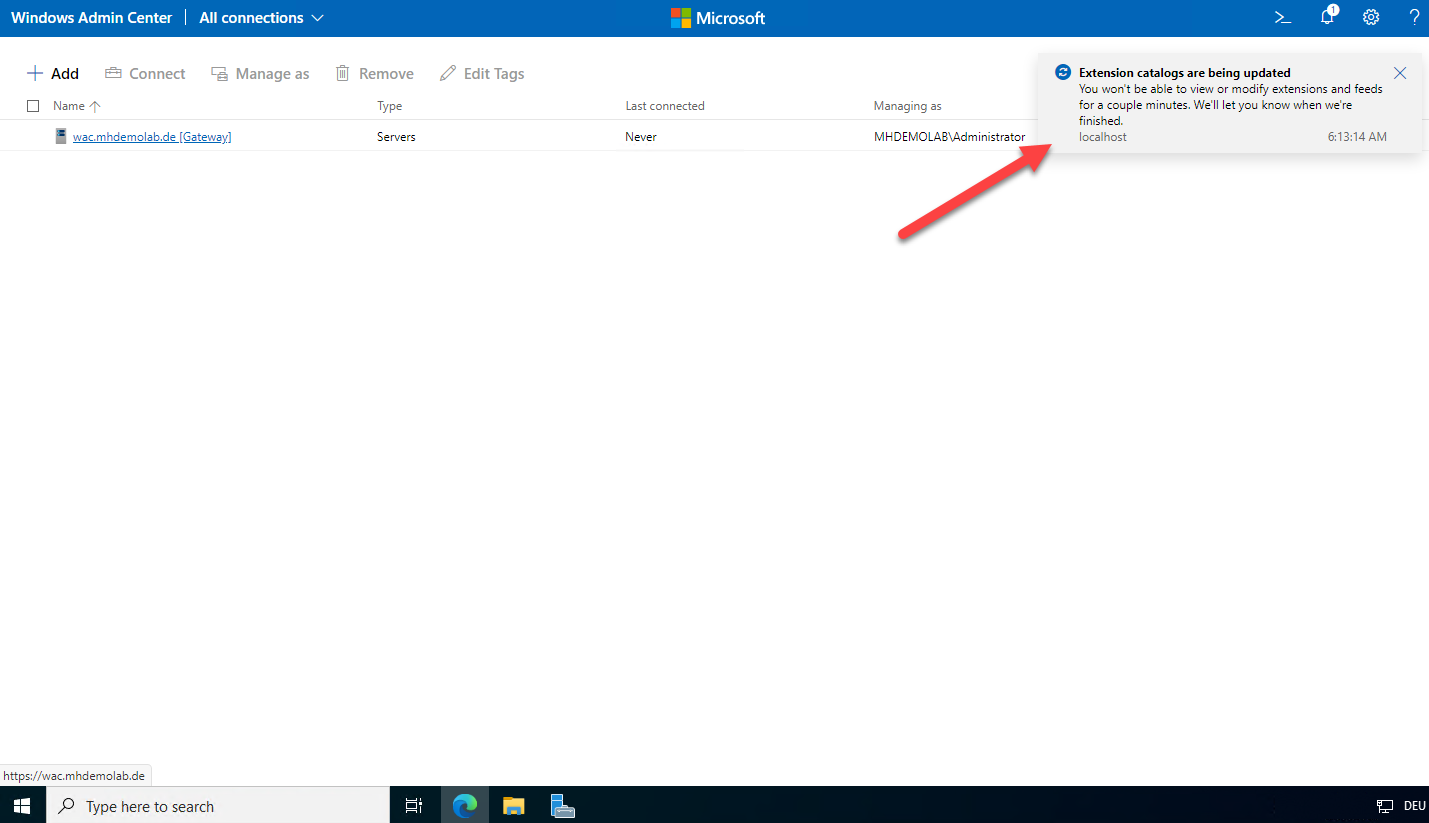
You are now on the Windows Admin Center main page. You will see your Windows Admin Center Gateway Server in the List of manageable systems. Click on the “Settings” icon (gear) on the upper right-hand corner:

On the settings-page you will find all the relevant settings for your Windows Admin Center installation. First recommendation is to set the language to your preferred Language. Click on “Language / Region” in the “Settings” List:
My recommendation is to choose here “English” for the language because many documentations about Windows Admin Center is written in English Language:

Choose your preferred Language and click on “Save and reload” on the bottom of the screen.
If your network uses a proxy server for internet access you can configure the proxy server in the “Gateway” section in the settings list:
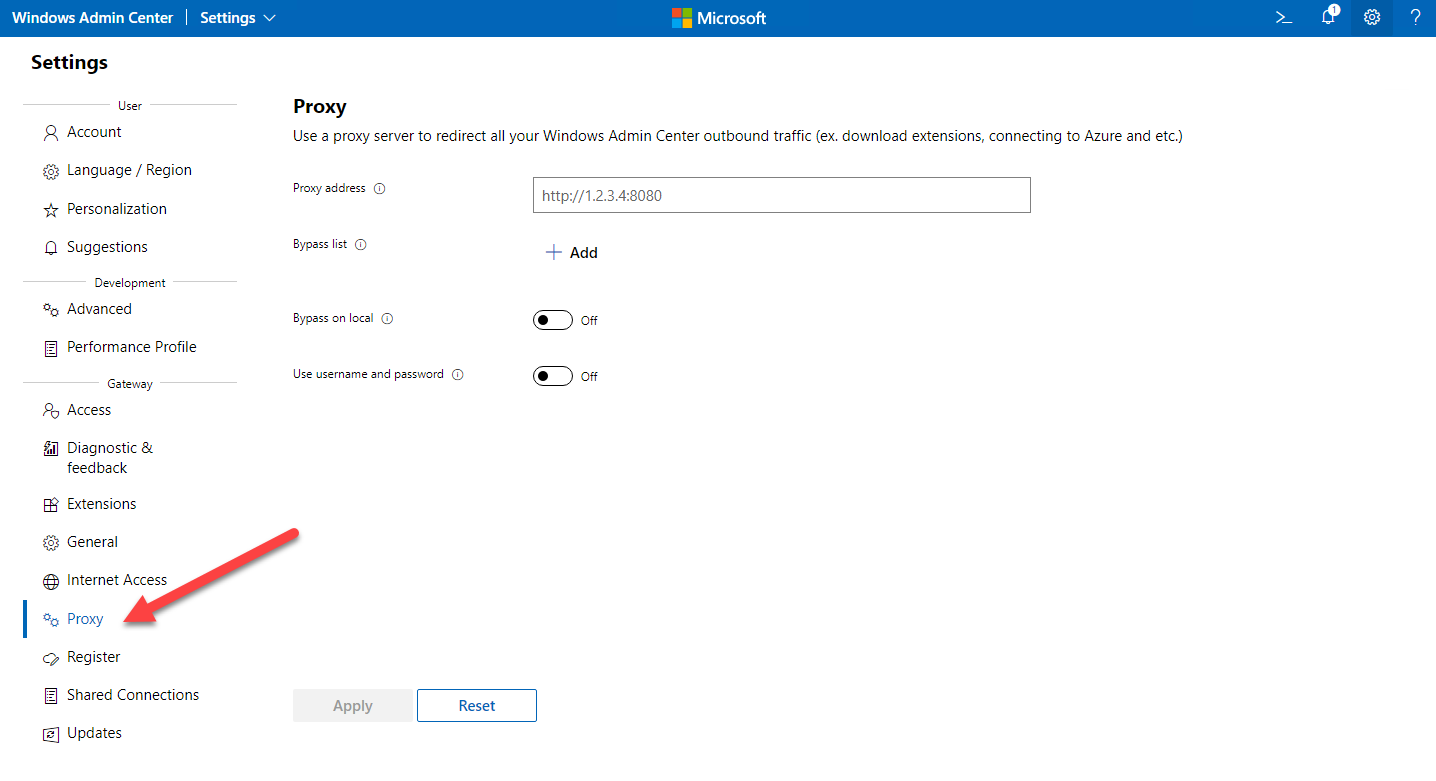
After configuring your Proxy settings click on “Apply”. If do not use a Proxy Server on your network don’t change here anything.
You can run Windows Admin Center without internet connectivity. Without internet connectivity there are some limitations:
- You cannot install any Extensions directly from the Extension feed – but you can manually side-load Extensions
- You cannot use any of the hybrid features in the Windows Admin Center hybrid center
- You cannot use internet related things like Windows Update Management
In the “Gateway” section in the “Settings” list you can configure three different Internet Access Options via clicking on “Internet Access”:
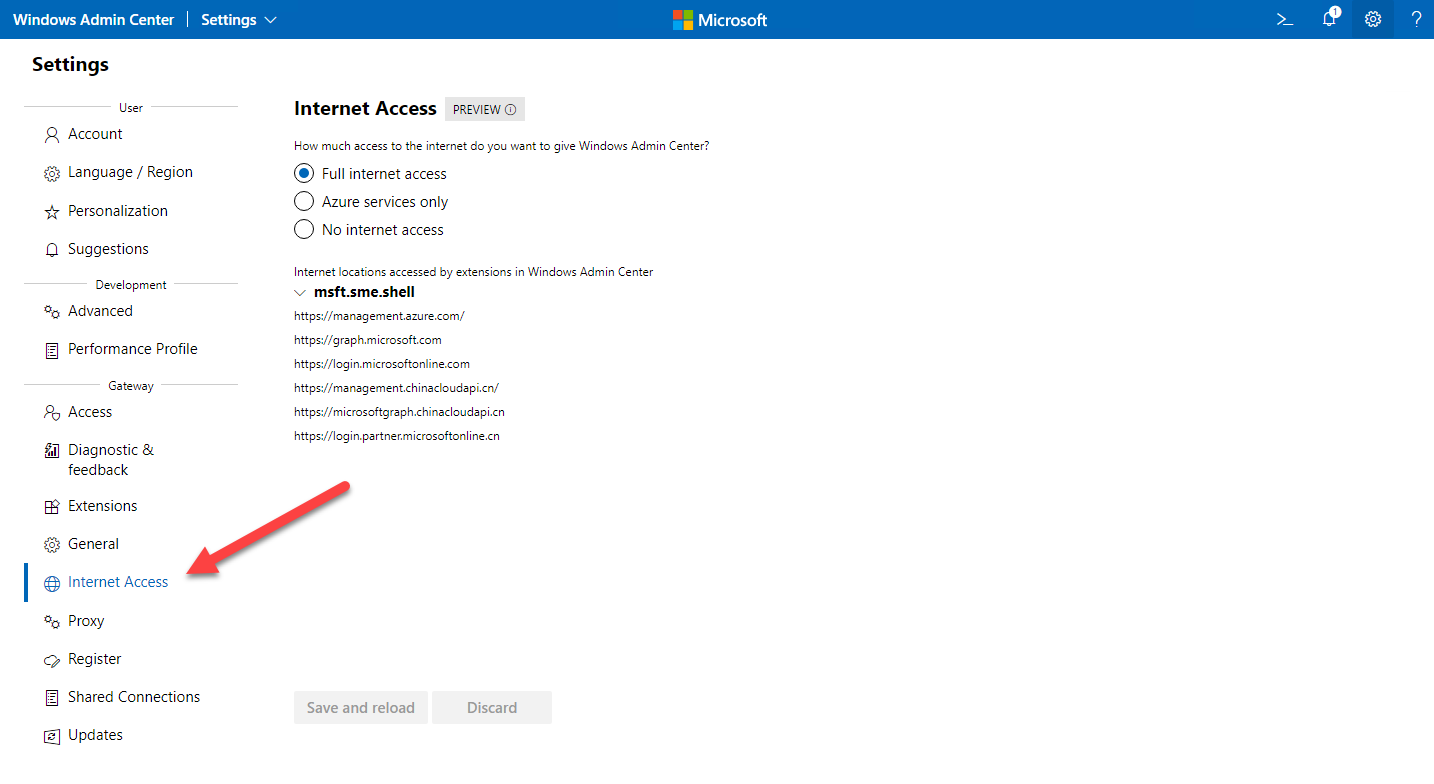
Recommendation is to choose “Full internet access”. If you choose “Azure services only” you can configure and access the Azure hybrid services via Windows Admin Center but no other internet services. When you select “No internet access” you will have the limitations mentioned above. If your internet access policy allows, please select “Full internet access” and click on “Save and reload”.
Now click on the text “Windows Admin Center” on the upper left-hand corner:

Add Servers to Windows Admin Center
This will bring you back to the main Windows Admin Center page. On the upper right-hand side, you will see four icons.
We already used the “Settings” gear.
The question mark (?) will show you information about your Windows Admin Center Version and support options. You should always ensure to use the latest Windows Admin Center Version.
Via the “PowerShell” Icon (>_) which PowerShell Cmdlets are triggered with your specific action in Windows Admin center.
When you click on “Notifications” – the symbol is the bell jar – you can select between “All”, “Errors & warnings”, “Active” and “Info”. The “Notification” area is important because not every Windows Admin Center page shows the progress of your current activity. In the “Notification” area you can always see what happens in your Windows Admin Center Environment, which tasks where successful and where you ran into problems:

Now click on “Close”.
In the next step we will add servers on your network to the List of systems managed by Windows Admin Center.
Click on “+ Add” on the upper left-hand corner on the Windows Admin Center main page:

There are several different resources you can add to Windows Admin Center or create in Windows Admin Center for management:
- “Servers” can be Windows Server 2016 or later without installing anything on the target server. Windows Server 2012 and 2012 R2 can also be added to Windows Admin Center if you install Windows Management Framework (WMF) 5.1 on the target servers.
- “Windows PCs” can be any supported version of Windows 10 or Windows 11 for business customers.
- Server Clusters can be any supported version of Windows Server or Azure stack HCI. You can add existing clusters or create new clusters.
- “Azure VMs” allows you to add existing VMs in your Azure subscription or create new VMs in Azure.
We will add existing servers on the domain network in the next step, so click on “Add” in the “Servers” section:


You can add single servers by typing their name in “Add one”, import servers by selecting a list of servers in “Import a list” or brows for existing servers in your Active Directory by clicking on “Search active Directory”.
We will use “Search Active Directory” to add several servers from the Active Directory to the list. In the search field you can add an asterisk as wildcard. You can directly start with an asterisk to list all computers from your active directory. In the following screenshot I entered “D114*” because I know in my demo-environment al relevant computers have a prefix “D114” – so I can only list these. In this list you can select on e or more target-computers by checking the checkbox in front of the computer name. Please select the computers you want to manage with Windows Admin center and click on “Add”:

In the following screenshot you can see I added 11 connections to the list. It might happen that you need to reauthenticated. It might also happen you get a message displayed that says that one or more targets are not reachable. In this case you can decide to add them despite this, or you can try it later again. Because Windows Admin Center doesn’t install anything on the target it is possible to add targets to the connection list that are not reachable. Keep in mind. There is no verification for non-reachable targets.
First steps in managing Windows Server with Windows Admin Center
Let’s have a look on one of the targets and check the available management options in Windows Admin Center. Klick on one of the servers you added to the connections-list. Because it is your first connection to one of these new servers you must enter credentials with administrative privileges on the target:
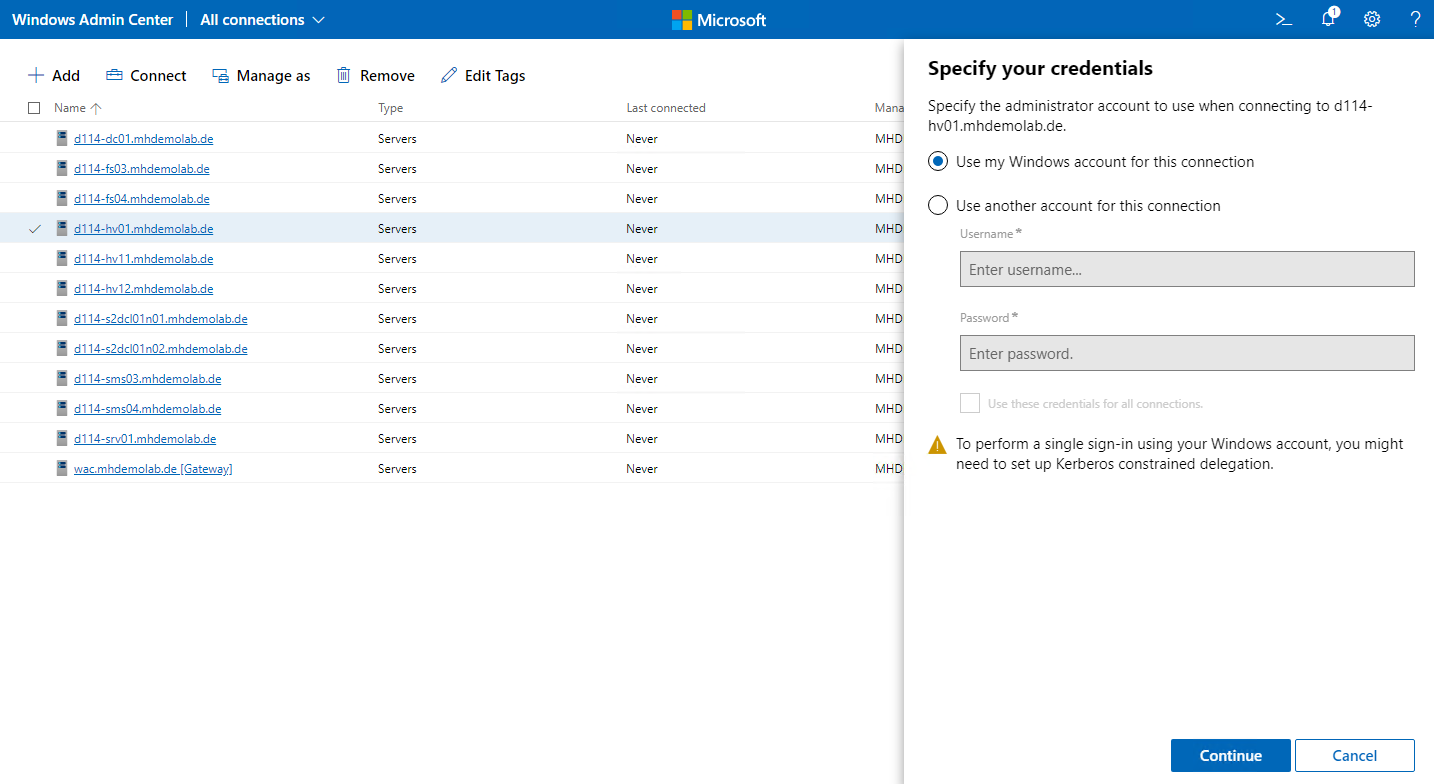
You can select “Use my Windows account for this connection” or “Use another account for this connection”. Select the option “Use another account for this connection” and enter credentials with administrative privileges on the target – then click “Continue”:
Now the overview page for the selected system opens. If you connect to a client or cluster, you will see different options on the Overview page. Different servers can also show different options depending on if they are configured as Domain Controller, Fileserver, Hyper-V host or other services.
My selected Server “d114-hv01” is a Windows Server 2022 Datacenter target configured as Hyper-V host:

On the left-hand side you will find the tools-list (red box). Below the tools-list you will find the server settings. In the main-area (green-box) you will find the details – depending on which tool you selected. Let’s first have a look at the “Overview” page – here you will find information about this server like version and edition, memory, CPU and much more. When you scroll down you will see the usage of your resources on this server:
Let’s have a look at some of the tools. First select “Roles & features” – here you can install and uninstall roles and features on the selected server:

If your server is also a Hyper-V host, you will find “Virtual machines” and “Virtual switches” in the tools list. When you click on “Virtual machines” you will see a page where you can add new VMs, connect to existing virtual machines, power on and off virtual machines and manage virtual machines:

Now select “Settings” below the tools list. In the “General” settings you can configure general server settings like SMB, Azure Arc for servers, Power configuration and Remote Desktop:

In the section “Hyper-V Host Settings” you will find the Hyper-V specific settings if your host is configured as Hyper-V Host. Here you find settings like Enhanced Session Mode, Live Migration and Storage Migration:

You should take some time to get familiar with the different tools and available configuration options. If you use Windows Admin Center for the first time you will be surprised how powerful these configuration options are.
Installing Extensions for Windows Admin Center
Windows Admin Center can also be extended with additional tools by installing Extensions. Extensions are available by Microsoft and 3rd party hardware and software partners. To install extensions, click on the settings icon (gear) on the upper right-hand corner:

On the “Settings” page click on “Extensions” to see a list of available Extensions. You will see Extensions with different information in the “Status” column. “Update” means you have the Extension already installed and there is a newer version available. “Available” means this is an available extension in the public extension feed you have not installed on this Windows Admin Center. You can upgrade an existing extension or install a new extension in selecting the extension in the list and then clicking on “Install”:
I will select “Active Directory” in the next step and then click on “Install”:

The Active Directory extension now will be installed:

You can now use the Active Directory Extension when you connect to a Domain Controller in your environment. Take some time to have a look at the other available extension. The OEM Extensions from Windows Server hardware partners are also very interesting.
This Step-by-step guide was written by:
Manfred Helber
Microsoft Most Valuable Professional (MVP) Cloud & Datacenter